
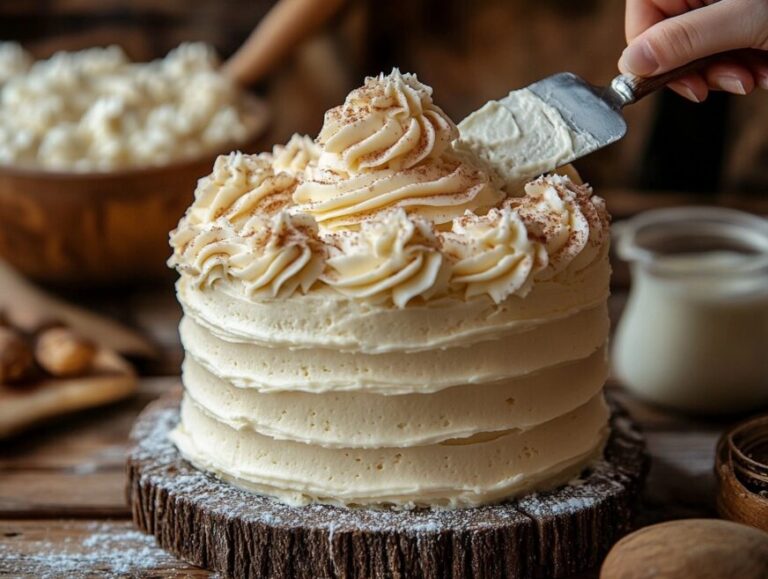
Few things elevate a cake or pastry like a luscious, creamy, and airy frosting. One of the best options? Whipped butter icing! This delectable frosting is a dream for home bakers and professionals alike, offering a light, velvety texture that melts in your mouth while still holding its shape beautifully.
Table of Contents
In this guide, we’ll take a deep dive into everything you need to know about whipped butter icing. From its history and ingredients to variations and troubleshooting tips, you’ll learn how to master this frosting for any occasion. Whether you’re decorating cakes, frosting cupcakes, or just spreading a little sweetness on cookies, this guide will equip you with all the essential know-how.
Now, let’s start by understanding what whipped butter icing is and why it has become a staple in modern baking.
Introduction to Whipped Butter Icing
What is Whipped Butter Icing?
Whipped butter icing is a type of frosting that combines softened butter with powdered sugar and a liquid (like milk or heavy cream) to create a light and fluffy texture. Unlike traditional buttercream, which can be dense and rich, this whipped version is airy, spreadable, and ideal for piping onto cakes and cupcakes. The key to its magic? Whipping it long enough to incorporate air, making it ultra-smooth and pillowy.
This icing is perfect for those who love the taste of buttercream but prefer a less heavy consistency. It strikes a beautiful balance between stability and fluffiness, making it a versatile choice for different desserts.
Historical Background
The origins of whipped butter icing stem from classic buttercream recipes, which have been around for centuries. Early versions date back to European patisseries, where bakers experimented with different frosting textures for cakes and pastries. Over time, as baking equipment improved and electric mixers became household staples, achieving a whipped texture became easier—leading to the popularity of this lighter frosting.
With the rise of creative cake decorating and home baking trends, whipped butter icing has gained traction as a go-to option for those seeking a professional finish without the heaviness of traditional buttercream.
Popularity in Modern Baking
Today, whipped butter icing is a favorite among bakers worldwide, thanks to its versatility and ease of use. It’s commonly used for:
- Birthday cakes: Provides a smooth, fluffy texture that pairs well with moist cake layers.
- Cupcakes: Holds its shape beautifully when piped, making it perfect for decorative swirls.
- Layer cakes: Creates a light and airy filling between layers.
- Cookies & pastries: Acts as a delectable topping or sandwich filling.
With its smooth, spreadable consistency and ability to take on different flavors and colors, whipped butter icing continues to be a staple in the world of baking.
Stay tuned for Part 2, where we’ll cover the essential ingredients and equipment needed to make the perfect batch of whipped butter icing!
Ingredients and Equipment Needed
Essential Ingredients for Whipped Butter Icing
Creating the perfect whipped butter icing requires a few key ingredients:
- Butter: Opt for unsalted, high-quality butter at room temperature. This ensures a rich flavor and smooth texture.
- Confectioners’ Sugar: Also known as powdered sugar, it dissolves easily, providing the icing’s sweetness and structure.
- Heavy Cream: Cold heavy cream helps achieve the desired fluffy consistency.
- Vanilla Extract: Pure vanilla extract enhances the icing’s flavor profile.
- Salt: A pinch of salt balances the sweetness, adding depth to the taste.
Recommended Equipment
To prepare whipped butter icing efficiently, the following tools are essential:
- Stand Mixer or Hand Mixer: A stand mixer with a whisk attachment is ideal for whipping the butter and cream to a light, airy consistency. However, a hand mixer can also suffice.
- Mixing Bowls: Use a large, preferably metal bowl for better temperature control during mixing.
- Spatula: A silicone spatula is perfect for scraping down the sides of the bowl, ensuring all ingredients are well incorporated.
- Measuring Cups and Spoons: Accurate measurements are crucial for achieving the desired taste and texture.
- Sieve: Sifting the confectioners’ sugar removes lumps, resulting in a smoother icing.
- Piping Bags and Tips: For decorating cakes or cupcakes, piping bags equipped with various nozzles allow for creative designs.
Having these ingredients and tools on hand will set the stage for crafting a delightful whipped butter icing that elevates your baked goods.
Step-by-Step Preparation Guide
Preparing the Ingredients
- Measure Accurately: Begin by measuring all ingredients precisely. This ensures consistency and the desired outcome.
- Soften the Butter: Leave the unsalted butter at room temperature until it’s pliable but not greasy. Properly softened butter is essential for achieving a smooth, creamy texture.
- Chill the Cream: Keep the heavy cream refrigerated until just before use. Cold cream whips better, contributing to the icing’s fluffiness.
Mixing Techniques
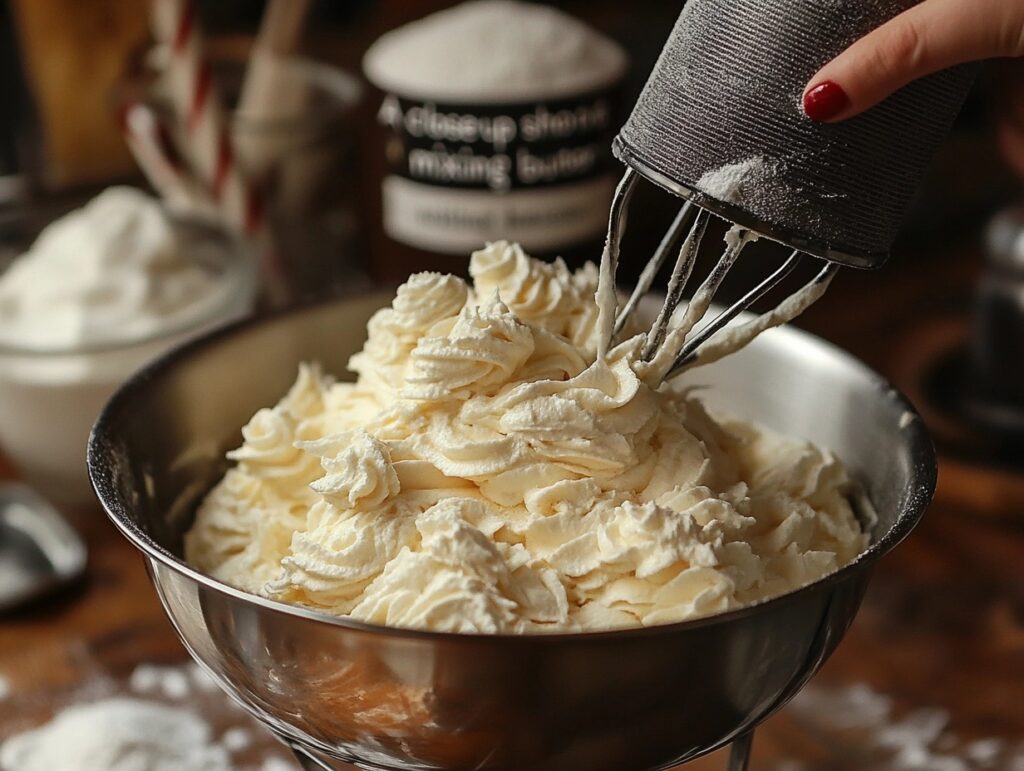
- Cream the Butter: Place the softened butter in your mixing bowl. Using a stand mixer fitted with the paddle attachment (or a hand mixer), beat the butter on medium speed until it’s light and creamy, approximately 3 minutes.
- Incorporate Confectioners’ Sugar: Gradually add the sifted confectioners’ sugar to the creamed butter. Mixing on low speed prevents sugar from scattering. Once combined, increase the speed to medium-high and continue beating until the mixture is fluffy.
- Add Flavorings and Cream: Pour in the pure vanilla extract and a pinch of salt. Then, add the cold heavy cream. Beat the mixture on high speed for about 3-4 minutes. This process incorporates air, resulting in a light and airy whipped butter icing.
Achieving the Perfect Whip
- Monitor Consistency: Observe the icing’s texture as you whip. It should be smooth, fluffy, and hold soft peaks. If it’s too thick, add a bit more cream; if too thin, incorporate a small amount of confectioners’ sugar.
- Avoid Overmixing: While it’s important to whip sufficiently to achieve fluffiness, overmixing can cause the icing to become grainy or too stiff. Stop mixing once the desired consistency is reached.
- Final Touches: Before using, give the icing a gentle stir with a spatula to eliminate any large air pockets, ensuring a smooth application on your baked goods.
By following these steps, you’ll create a delectable whipped butter icing that’s perfect for enhancing cakes, cupcakes, and other desserts.
Variations of Whipped Butter Icing
Flavor Infusions
One of the joys of whipped butter icing is its versatility in accommodating various flavors. By incorporating different extracts, zests, or purees, you can tailor the icing to complement any dessert.
- Chocolate: Melted and cooled dark or milk chocolate can be blended into the icing for a rich, indulgent taste. Alternatively, sifting in cocoa powder offers a deep chocolate flavor without altering the icing’s consistency.
- Fruit Flavors: Purees from berries, citrus zests, or even tropical fruits like mango can be added to infuse the icing with natural fruit essences. Ensure that purees are thick and concentrated to prevent thinning the icing.
- Extracts and Essences: Beyond vanilla, consider almond, peppermint, or coconut extracts. A few drops can significantly alter the icing’s profile, making it suitable for various themes and occasions.
Color Customization
Achieving the desired hue in whipped butter icing enhances the visual appeal of your creations.
- Natural Colorants: Ingredients like beet juice for red, matcha powder for green, or turmeric for yellow can impart subtle, natural colors. These not only add color but also introduce mild, complementary flavors.
- Artificial Food Coloring: Gel-based food colorings are preferred as they provide vibrant shades without altering the icing’s texture. Add color gradually, mixing thoroughly to achieve the desired intensity.
Dietary Modifications
Adapting whipped butter icing to meet dietary preferences or restrictions is straightforward.
- Dairy-Free and Vegan Alternatives: Replace butter with plant-based margarine or vegetable shortening. For the liquid component, use almond milk, soy milk, or coconut milk. Ensure all other ingredients, like sugar, are also vegan-friendly.
- Reduced Sugar Options: Utilize sugar substitutes such as stevia or erythritol. Be mindful that these may affect the icing’s texture and sweetness level, so adjustments might be necessary.
By experimenting with these variations, whipped butter icing can be customized to suit a wide range of tastes and dietary needs, making it a versatile choice for any baker.
Applications in Baking
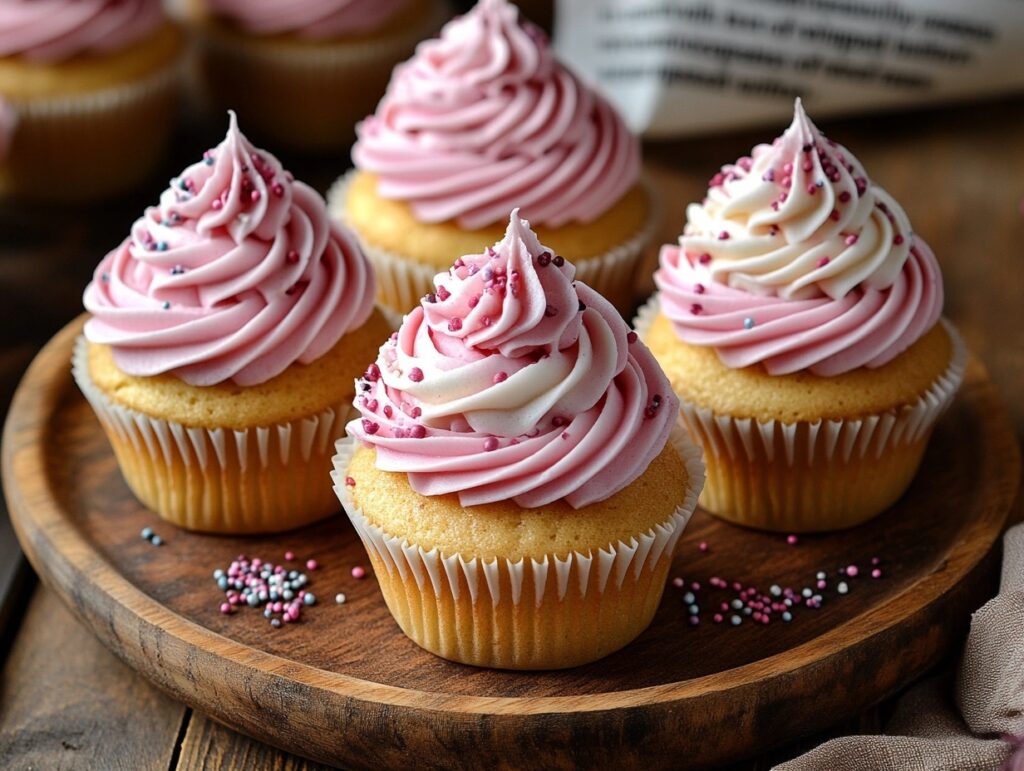
Cakes and Cupcakes
Whipped butter icing is a classic choice for frosting cakes and cupcakes due to its smooth texture and ability to hold shapes well.
- Layer Cakes: Its lightness makes it ideal for filling and covering multi-layered cakes, providing a balanced sweetness that doesn’t overpower the cake’s flavor.
- Cupcakes: The icing pipes beautifully, allowing for decorative swirls and patterns that set cupcakes apart visually.
If you’re planning a special occasion, such as a gender reveal party, whipped butter icing is perfect for decorating themed cupcakes with pink or blue colors. For inspiration, check out this Gender Reveal Cupcakes Guide to learn how to create cupcakes that surprise and delight!
Cookies and Pastries
Beyond cakes, whipped butter icing enhances various other baked goods.
- Cookies: Spread a thin layer on sugar cookies or sandwich it between two cookies for added flavor and texture.
- Pastries: Use it to top pastries like éclairs or as a filling for cream puffs, adding a rich, creamy element that complements the pastry’s crispness.
Special Occasion Treats
For celebrations and themed events, whipped butter icing offers both aesthetic appeal and delightful taste.
- Weddings and Birthdays: Its versatility allows for coloring and flavoring to match event themes, making it a popular choice for custom cakes.
- Holidays: During festive seasons, the icing can be tinted in various colors and flavored with seasonal spices or extracts to create themed desserts that delight both the eyes and the palate.
Incorporating whipped butter icing into your baking repertoire opens up a world of possibilities, enhancing both the flavor and appearance of a wide array of desserts.
Troubleshooting Common Issues
Even with the best ingredients and techniques, making whipped butter icing can sometimes present challenges. Here’s how to fix the most common problems.
Consistency Problems
A key factor in perfecting whipped butter icing is achieving the right consistency. If the icing is too runny, it may not hold its shape on cakes and cupcakes.
- Solution: Add more confectioners’ sugar, one tablespoon at a time, until the desired thickness is reached. If the weather is warm, refrigerate the icing for 10-15 minutes to firm it up.
On the other hand, if the icing is too stiff or grainy, it may be difficult to spread or pipe.
- Solution: Mix in a teaspoon of heavy cream or milk at a time until the icing softens and becomes smoother. Ensure the butter is at room temperature before whipping to prevent graininess.
Flavor Adjustments
Sometimes, the icing might taste overly sweet or lack depth in flavor.
- Solution: Add a pinch of salt to balance the sweetness. If more complexity is needed, a splash of vanilla extract or a squeeze of citrus juice can brighten the flavor.
Storage and Shelf-Life
Proper storage helps maintain the texture and taste of whipped butter icing.
- Short-term: Store in an airtight container in the refrigerator for up to 5 days. Let it come to room temperature and re-whip before using.
- Long-term: Freeze for up to 2 months. Thaw in the fridge overnight, then beat again to restore its fluffiness.
By following these fixes, you’ll ensure your whipped butter icing stays smooth, delicious, and easy to work with.
Comparing Whipped Butter Icing to Other Frostings
Many people confuse whipped butter icing with other types of frostings, but key differences set them apart. Let’s break it down.
Buttercream vs. Whipped Icing
Both buttercream and whipped butter icing are popular choices for cakes, but they have distinct textures and uses.
- Buttercream: Traditional buttercream is thicker, denser, and sweeter. It’s made with butter and confectioners’ sugar but doesn’t always require heavy whipping. This makes it more stable for layered cakes and intricate decorations.
- Whipped Butter Icing: Unlike standard buttercream, whipped butter icing is lighter and fluffier due to the additional air incorporated during mixing. This makes it easier to spread and gives a softer mouthfeel.
Suitability for Different Baked Goods
Choosing the right frosting depends on the type of dessert.
- For Layered Cakes: Buttercream is better for structured, tiered cakes as it holds its shape longer.
- For Cupcakes and Light Cakes: Whipped butter icing is an excellent choice because of its airy, melt-in-your-mouth texture.
- For Warm Climates: Traditional buttercream holds up better in heat, while whipped butter icing may soften quickly.
Each frosting has its advantages, but if you’re looking for something smooth, creamy, and easy to spread, whipped butter icing is a fantastic option for many desserts.
Frequently Asked Questions
When working with whipped butter icing, many bakers have common questions. Here are answers to some of the most frequently asked ones.
What is the difference between buttercream icing and whipped icing?
While both are popular frosting choices, they have different textures. Whipped butter icing is lighter and airier because of the additional whipping time, making it easier to spread. Traditional buttercream, on the other hand, is denser and richer, providing a more structured finish for intricate decorations.
How long should I whip my buttercream?
To achieve the perfect consistency, whipped butter icing should be mixed for 3 to 5 minutes at medium-high speed. Over-whipping can cause the icing to become grainy or separated, while under-whipping results in a dense, heavy texture.
Can buttercream be over-whipped?
Yes, whipped butter icing can be over-whipped. If beaten too long, the air bubbles can collapse, leading to a grainy or curdled texture. To fix this, add a splash of heavy cream and mix at a low speed until it smooths out.
Is whipped icing good for cakes?
Absolutely! Whipped butter icing works well for cakes, especially light sponge cakes and cupcakes. However, in warm conditions, it can soften quickly, so refrigeration may be needed before serving.
Conclusion
Whipped butter icing is a game-changer for bakers looking for a smooth, airy, and easy-to-spread frosting. Whether you’re frosting cakes, decorating cupcakes, or filling pastries, its light texture and creamy taste make it a versatile choice.
By understanding the key ingredients, mastering the whipping technique, and troubleshooting common issues, you can create perfectly fluffy icing every time. Plus, with so many variations, there’s room for endless creativity.
Now that you know how to make whipped butter icing, why not try it on your next baking project? Experiment with flavors, colors, and designs to make every dessert extra special!

Whipped Butter Icing
Ingredients
Equipment
Method
- In a large mixing bowl, beat the softened butter using a stand mixer or hand mixer on medium speed until creamy and light, about 2-3 minutes.
- Gradually add the sifted confectioners’ sugar, one cup at a time, beating on low speed after each addition until fully incorporated.
- Add the vanilla extract and salt, then mix to combine.
- Slowly drizzle in the cold heavy cream while mixing on low speed.
- Increase the speed to high and whip for 3-4 minutes, or until the icing becomes light, fluffy, and smooth.
- If the frosting is too thick, add more heavy cream, one teaspoon at a time. If too thin, add more confectioners’ sugar.
- Use immediately for frosting cakes, cupcakes, or cookies. Store leftovers in an airtight container in the refrigerator for up to 5 days.