
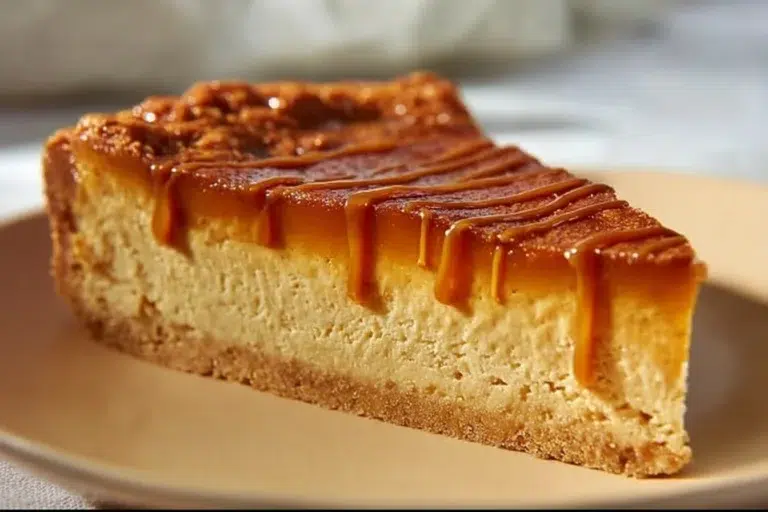
Oh, Vanilla Magic Cake! I fondly remember the first time I stumbled upon this wondrous dessert in a quaint little bakery tucked away in a sleepy corner of town. The scent of warm vanilla wafting through the air wrapped around me like a cozy blanket on a chilly day. Curiosity piqued, I stepped inside and was greeted by a dazzling array of treats, but it was the Vanilla Magic Cake that truly caught my eye. Its golden top glistened, and each slice revealed an inviting, layered interior that seemed to whisper, “Take me home.”
Table of Contents
The joyful crunch of the top layer transitioning into a creamy custard-like filling was something I’d never experienced before. With every bite, the flavors danced on my tongue, enchanting me into blissful happiness. This cake is not just a dessert; it’s a nostalgic hug from the past, reminding us of simple pleasures and warm kitchens. I have loved sharing this recipe with friends and family—and now, dear readers, I’m thrilled to share it with you! Prepare to be captivated by its magic.
Why You’ll Love This Recipe
- Simple to Make: With just a few ingredients and straightforward steps, you’ll feel like a baking pro in your cozy kitchen!
- Delicious Layers: Experience three delightful textures in every bite—a light sponge, a creamy custard, and a heavenly top layer.
- Excellent for Sharing: Perfect for gatherings, guaranteeing smiles all around!
- Versatile Base: This recipe is a canvas for your creativity, allowing for seasonal variations or delightful add-ins.
- No Need for Fancy Skills: You don’t need to be a pastry chef to create this masterpiece; it’s all about love and patience!
Ingredients
- 4 eggs: These are the magic workers that bring structure to our cake, giving it the perfect lift. Be sure they are at room temperature for even mixing!
- 150g of sugar: Sweetness is key! This sugar not only sweetens but also contributes to the lovely golden color and texture.
- 125g of flour: Look for all-purpose flour here; it helps hold everything together without being too heavy.
- 1/2 liter of milk: Choose whole milk for a creamy, luscious texture that makes this dessert so soothing.
- 100g of unsalted butter: This adds richness. Don’t forget to melt and let it cool slightly before adding—it’s magic in every dollop!
- 1 teaspoon of vanilla extract: The star of our show! A splash of quality vanilla will impart a warm aroma and flavor that you’ll love.
- A pinch of salt: A little salt balances the sweetness and enhances the overall flavor profile beautifully.
Full recipe card is below.
How to Make It
1. Preheat Your Oven
Set your oven to 160°C (320°F). Let it warm up while you prepare the magic mixture!
2. Melt the Butter
In a small saucepan, melt the butter over low heat. Allow it to cool for a few minutes—trust me, we don’t want those eggs scrambling in reverse!
3. Whisk the Eggs and Sugar
In a mixing bowl, whisk together the eggs and sugar until the mixture turns pale and fluffy—about 3-5 minutes. The sweet scent will be intoxicating!
4. Mix in the Butter and Vanilla
Add the cooled melted butter and vanilla extract to your egg mixture. Stir until fully blended; it should smell divine at this point!
5. Sift in Flour and Salt
Next, sift in the flour and a pinch of salt, folding it gently until the batter is smooth. This prevents lumps and adds a touch of love!
6. Gradually Add Milk
Pour in the milk gradually, mixing continuously. The batter will be thinner than a typical cake batter, and it should look delightful!
7. Pour into Baking Dish
Carefully pour the batter into a greased baking dish (like a square cake pan). Give it a little shake to level the batter.
8. Bake to Perfection
Pop it in the oven and let it bake for 40-50 minutes. Your kitchen will begin to smell like heaven! It’s done when the top is golden and a toothpick inserted comes out clean.
9. Cool Before Serving
Allow the cake to cool in the dish for about 10 minutes before transferring to a wire rack to cool completely. Patience is key, and it will be worth it!
Pro Tips for Success
- Use Room Temperature Ingredients: This helps achieve an airy batter that mixes well.
- Don’t Overmix: Gently fold when adding flour to keep that lovely light texture.
- Check the Oven: Oven temperatures can vary. Keep an eye on your cake as it bakes!
- Cool Properly: Cooling is essential—the cake will continue to set as it cools and will be easier to slice.
Flavor Variations
- Chocolate Magic Cake: Swap out some flour for cocoa powder for a chocolaty twist!
- Citrus Zing: Add the zest of a lemon or orange to the batter for a refreshing flavor.
- Nuts and Spices: Chopped nuts, cinnamon, or nutmeg can be delightful additions to your cake!
Serving Suggestions
This Vanilla Magic Cake can be enjoyed warm or chilled, topped with whipped cream, fresh berries, or a drizzle of caramel. For drinks, I recommend a cup of freshly brewed coffee or a warm cup of tea to warm your soul.
Make-Ahead & Storage
You can bake this cake a day in advance! Just store it covered at room temperature. If you plan to keep it for longer, we’ll talk about freezing later on. It stays fresh for about 3-5 days in an airtight container.
Leftovers
If you have any leftovers (a rare occurrence, I promise!), you can transform slices into delightful parfaits with layers of yogurt and fruit for a perfect brunch treat!
Freezing
Yes, this cake can be frozen! Wrap it tightly in plastic wrap and aluminum foil, then pop it in the freezer. It’ll last for about 1-2 months. To thaw, simply move it to the fridge overnight.
Reheating
For the best results, reheat slices in the oven at 150°C (300°F) for about 10 minutes until warmed through. A microwave works in a pinch too—just be cautious not to overheat it!
FAQs
Can I use a different type of milk?
Absolutely! Almond milk, oat milk, or any dairy-free alternative will work wonderfully.
Why does my cake have a layer at the bottom?
That’s the magic! The layers form naturally as it bakes, creating that delightful texture.
Can I turn this into cupcakes?
Yes! Just adjust the baking time to around 20-25 minutes, checking for doneness.
What if I don’t have a whisk?
No worries! A fork or a handheld mixer works just as well.
Final Thoughts
As you create this Vanilla Magic Cake in your cozy kitchen, may you feel the warmth of nostalgia wrapping around you just as I did years ago. Every chewy, creamy, and fluffy bite is a reminder of how the simplest ingredients can make magic happen. Enjoy this delightful journey, and remember—baking is not just about the final product, but also the love and laughter shared along the way. Happy baking, my lovelies! Love, Chef Emily ❤️✨
Vanilla Magic Cake
Ingredients
Method
- Preheat your oven to 160°C (320°F).
- Melt the butter over low heat and allow it to cool.
- Whisk together the eggs and sugar until pale and fluffy (about 3-5 minutes).
- Add the cooled melted butter and vanilla extract to the egg mixture and stir until fully blended.
- Sift in the flour and salt, folding gently until the batter is smooth.
- Gradually pour in the milk, mixing continuously until the batter is well combined.
- Pour the batter into a greased baking dish and level it.
- Bake in the preheated oven for 40-50 minutes until golden and a toothpick inserted comes out clean.
- Allow the cake to cool in the dish for about 10 minutes before transferring to a wire rack.