
Table of Contents
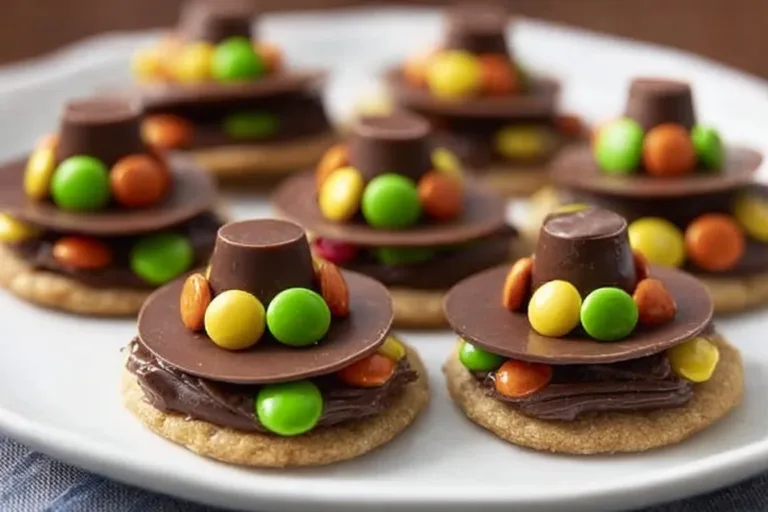
As soon as the crisp autumn air settles in, my heart skips a beat, reminiscing about my first encounter with Pilgrim Hat Decorated Cookies. It was a chilly November afternoon, and the kitchen was filled with the intoxicating aroma of freshly baked chocolate cookies. I was experimenting with festive treats to share with friends and family when I stumbled upon this delightful concoction. The moment I dipped those mini peanut butter cups into warm chocolate and adorned them with candy corn, I felt a wave of joy wash over me. It was whimsical, it was delicious, and best of all, it was the kind of recipe that brings people together. The sweet, nutty flavor of the peanut butter combined with the richness of the chocolate hugs your taste buds in the coziest way—I just knew this little treat would become an annual must-have for my Thanksgiving gatherings, and I’m sure you’ll love it just as much!
Why You’ll Love This Recipe
- Quick and Easy: With just a few simple steps, these cookies can come together in no time!
- Fun for All Ages: Kids and adults alike will love decorating these sweet hats together.
- Crowd-Pleasing: They’re not just cute; they disappear fast at any gathering!
- Rich Flavors: The chocolate and peanut butter combination is always a winning duo.
- Festive Touch: Perfect for Thanksgiving or as a creative holiday treat.
Ingredients
- Chocolate Cookies: The base of our pilgrim hats, these should be soft and chewy. Ain’t nothing like the warm, melt-in-your-mouth vibe!
- Peanut Butter Cups (Mini): These little gems will be the “hats.” Look for ones that are smooth and perfectly round for the best results.
- Chocolate Melts: We love the convenience! Melting chocolate adds a glossy finish and luscious flavor to our cookies.
- Candy Corn: A small piece of candy corn as a “buckle” of the hat adds a fun burst of color and sweetness—who can resist that?
Full recipe card is below.
How to Make It
Step 1: Prepare the Base
Place the chocolate cookies on a tray. As you arrange them, take a moment to revel in the sight of those dark, inviting cookies—they practically whisper “eat me!”
Step 2: Melt the Chocolate
Melt the chocolate melts according to package instructions. The enticing scent of melting chocolate will wrap around your kitchen like a warm hug, promising a treat worth the wait. Be sure to stir gently until smooth—no lumps allowed!
Step 3: Build Your Pilgrim Hats
Dip the bottom of a mini peanut butter cup into the melted chocolate and place it right on top of a cookie. Feel free to get a little messy—after all, messy kitchens are the happiest ones!
Step 4: Add the Buckle
Using a spoon, drizzle a tiny bit of melted chocolate at the top of the peanut butter cup and carefully place a piece of candy corn right on top. You’ll see that magical moment where simple ingredients come together, creating whimsical little hats!
Step 5: Allow to Set
Now, let these beauties set for a few moments. You can pop them in the fridge for about 10 minutes if you’re too excited to wait—it just means the chocolate will set quickly.
Pro Tips for Success
- Use Quality Ingredients: Go for high-quality chocolate and peanut butter cups for the best flavor.
- Chill Your Trays: If it’s a warm day, chill your cookie tray in the fridge before decorating to help the chocolate set quicker.
- Decorate with Love: Get creative! Let your kids help with the decorating; it’ll make for fun memories.
- Storage: Keep them in an airtight container to maintain freshness.
Flavor Variations
- Spice It Up: Add a pinch of cinnamon or nutmeg to the cookie dough for a warm, spicy kick.
- Nutty Twist: Swap out the peanut butter cups for caramel-filled chocolates if you’re feeling adventurous!
- Seasonal Fun: Use colored chocolate melts for different holidays—think red and green for Christmas!
Serving Suggestions
These cookies are lovely served on a rustic wooden platter accompanied by a hot cup of cider or cocoa. They make a wonderful addition to a dessert table or as a sweet treat for an afternoon gathering.
Make-Ahead & Storage
You can prep these cookies ahead of time! Assemble and decorate them a day in advance. Store them in an airtight container at room temperature for up to a week—though I doubt they’ll last that long!
Leftovers
If you have any cookies left—which is unlikely—try crumbling them over ice cream for a fun dessert. The crunch of the cookies paired with the creaminess is heavenly!
Freezing
Yes, you can freeze these treats! Just make sure to wrap them individually in plastic wrap and then place them in a freezer bag. Thaw them on the counter for a delightful cold-weather pick-me-up.
Reheating
If you prefer to enjoy them warm, pop them in the microwave for a few seconds. Keep an eye on them, though—warm cookies are heavenly, but melted chocolate can get messy!
FAQs
Can I use a different type of cookie?
Absolutely! Feel free to switch out chocolate cookies for gingerbread or sugar cookies for a different flavor profile.
Are these suitable for gluten-free diets?
Yes, simply use gluten-free chocolate cookies, and your loved ones can enjoy them too!
How can I make them more festive?
Consider adding edible glitter or seasonal sprinkles on top for an extra pop!
Can I use white chocolate instead?
Yes, white chocolate melts can add a lovely contrast and make your pilgrim hats pop!
Final Thoughts
As you gather with your loved ones this holiday season, I hope you create comforting traditions filled with laughter and delicious treats like these delightful Pilgrim Hat Decorated Cookies. They’re not just about the sweetness of chocolate and peanut butter, but the joy of sharing and creating moments together. So, roll up your sleeves, gather your family, and let’s whip up some cozy magic in the kitchen—happy baking, friends! With love, Chef Emily.
Pilgrim Hat Decorated Cookies
Ingredients
Method
- Place the chocolate cookies on a tray.
- Melt the chocolate melts according to package instructions until smooth.
- Dip the bottom of a mini peanut butter cup into the melted chocolate and place it on top of a cookie.
- Drizzle a tiny bit of melted chocolate on top of the peanut butter cup and place a piece of candy corn on top.
- Allow the cookies to set, or refrigerate for 10 minutes to speed up the process.