
Ah, Frosted Christmas Brownies! There’s something utterly magical about the moment when the rich, chocolatey aroma fills my cozy kitchen, casting a festive vibe with every inhalation. These delightful treats were born one snowy afternoon when I was rummaging through my pantry, yearning for a sweet indulgence. As I gazed at my trusty brownie mix, I knew a simple bake could become something more festive when topped with a swirl of vibrant icing.
Table of Contents
In just a few hours, my home was transformed into a winter wonderland, with the smell of freshly baked brownies mingling with hints of peppermint and spices wafting through the air. Each brownie emerged warm, fudgy, and so inviting, especially when topped with white frosting, colorful decorations, and a sprinkle of edible gold stars. Friends and family quickly fell in love with these beauties, and I promise, once you taste them, you’ll be captivated too! They’re not just brownies; they are bundled joy, perfect for celebrating the season.
Why You’ll Love This Recipe
- Crowd-Pleasing: Everyone loves brownies, and with festive colors and toppings, they’ll be the talk of your holiday gathering!
- Easy and Quick: With only a few simple steps, you’ll be ready to impress your guests in no time.
- Customizable: Use your favorite food colors and toppings to make these brownies uniquely yours.
- Decadent Flavor: The rich chocolaty base topped with creamy frosting is a match made in dessert heaven.
- Memorable Moments: Making these brownies is a fun family activity that brings joy and festive spirit into your kitchen.
Ingredients
- 2 Boxes of Brownie Mix: Use your favorite brand for rich, fudgy brownies. Opt for a double batch of homemade brownies if you’re feeling ambitious!
- White Frosting (1-3 jars): The creamy base that will hold all those wonderful decorations!
- Edible Gel Food Coloring: Perfect for adding festivity to your frosting. If you’re avoiding artificial colors, look for natural alternatives!
- Edible Gold Stars: These give your brownies a touch of sparkle and magic that’s just perfect for the season.
- White Pearl Sprinkles: For that lovely textured finish, these pearls add a delightful crunch.
- Icing Bags: Essential for decorating! A sturdy bag allows for good control as you create your holiday masterpieces.
- Frosting Tips (large star – 1M): A large star tip is perfect for making beautiful swirls in your frosting.
Full recipe card is below.
How to Make It
First, preheat the oven
Preheat the oven according to your brownie box instructions. While it’s warming up, grab a 9-inch springform pan and give it a good spray of oil. A well-greased pan ensures your brownies will pop right out!
Mix both brownie mixes
In a mixing bowl, combine both boxes of brownie mix with the ingredients listed on the package. The smell of that rich chocolate goodness is already filling the air!
Bake those brownies
Pour the mixture into your prepared springform pan and bake according to the packaging instructions, typically around 25-30 minutes, or until a toothpick comes out clean. Oh, the wonderful scent wafting through your kitchen as they bake will warm your heart!
Cool and cut
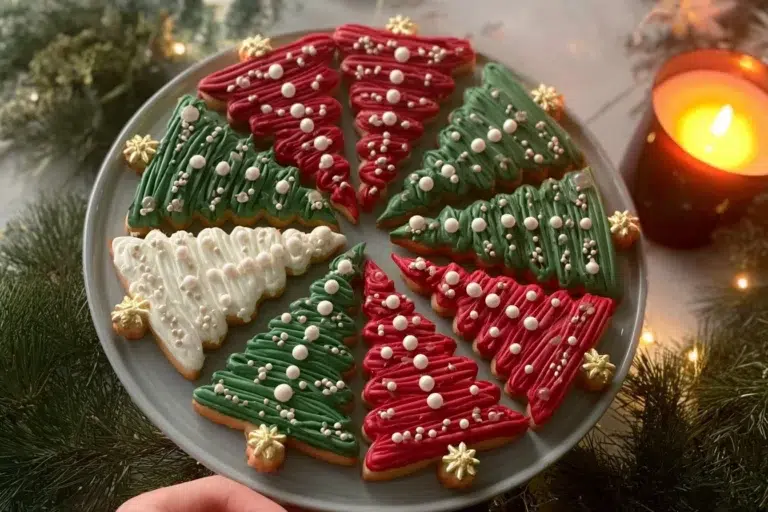
Once the brownie is baked, allow it to cool completely in the pan. Then, remove it, place it on a cutting board, and cut the brownie into 8 triangular slices. These will be your delightful holiday trees and hats!
Create your frosting magic
In small bowls, mix the white frosting with red and green food coloring. Feel free to add enough to bring that festive cheer to life!
Pack those icing bags
Place your freshly colored frosting into separate icing bags, each fitted with your favorite frosting tips. Decorating is where the fun really begins!
Decorate and serve
Use the green frosting to create adorable Christmas trees topped with white pearl sprinkles, and make Santa Claus hats with red and white frosting. The joy of decorating can hardly be beaten, especially when those edible gold stars come into play!
Enjoy!
Take a moment to appreciate your beautiful creations, and of course, dig in and enjoy the deliciousness you’ve created!
Pro Tips for Success
- Let Them Cool: Don’t rush the cooling process! Once baked, let them cool completely before cutting to get those perfect edges.
- Color Mix: If you want pastel colors, add just a touch of food coloring; it can make a big difference.
- Experiment: Don’t hesitate to mix and match colors; it makes for a more vibrant and festive presentation!
- Getting Creative: You can use cookie cutters for fun shapes—gingerbread men, snowflakes, or stars would be fantastic!
Flavor Variations
- Minty Twist: Add some peppermint extract to the brownie mix for a refreshing mint chocolate flavor!
- Nutty Delight: Toss in some walnuts or pecans for added crunch!
- Spiced Sensation: Sprinkle a hint of cinnamon or nutmeg into the frosting for a festive twist.
Serving Suggestions
Pair your Frosted Christmas Brownies with a warm cup of hot cocoa or coffee for the ultimate cozy treat. Present them on a festive platter, garnished with fresh mint leaves or a sprinkle of powdered sugar for an elegant touch. They make a delightful gift wrapped in cellophane with a lovely ribbon!
Make-Ahead & Storage
You can make your brownies a day in advance! Store them covered at room temperature for up to 3 days. The brownies stay fudgey and delicious, ready to be decorated just before serving!
Leftovers
If you’re lucky enough to have leftovers, try crumbling them over vanilla ice cream for an indulgent dessert! Or simply snack on them while cozying up with your favorite holiday movie.
Freezing
Yes, these brownies can be frozen! Wrap them tightly in plastic wrap, followed by aluminum foil for extra protection. Thaw overnight in the fridge when you’re ready to enjoy more sweet treats.
Reheating
For the best reheating results, place them in a 350°F oven for about 10-15 minutes, or microwave them for 15-20 seconds until warm—perfectly gooey!
FAQs
Can I substitute homemade brownies instead of using the mix?
Absolutely! A homemade brownie recipe would make these brownies even more special. Just ensure you have a good texture that can hold up under the frosting.
How can I store leftover brownies?
Keep them in an airtight container at room temperature for up to 3 days, or freeze them for longer storage.
Can I use different colors for the frosting?
Definitely! Get creative with the colors for each season or event to make them truly unique.
Are these brownies suitable for kids?
Yes! They’re not only kid-friendly, but they also make for a great family activity, helping to decorate together is a blast!
Final Thoughts
There’s something truly heartwarming about baking and sharing these Frosted Christmas Brownies. The love put into each bite, the smiles they bring, and the joyful memories made in the kitchen—these are the moments that make the holiday season so special. So gather around the counter, splash some colors, and sprinkle a bit of cheer; that’s what baking is all about! Happy baking, my friends, and may your holidays be filled with warmth, joy, and, of course, delicious treats. 🍫✨

Frosted Christmas Brownies
Ingredients
Method
- Preheat the oven according to your brownie box instructions. Grease a 9-inch springform pan.
- In a mixing bowl, combine both boxes of brownie mix with the ingredients listed on the package.
- Pour the mixture into your prepared springform pan and bake according to the packaging instructions, typically around 25-30 minutes, or until a toothpick comes out clean.
- Allow the brownie to cool completely in the pan.
- Remove the brownie, place it on a cutting board, and cut into 8 triangular slices.
- In small bowls, mix the white frosting with red and green food coloring.
- Pack the colored frosting into separate icing bags fitted with your favorite frosting tips.
- Use the green frosting to create Christmas trees and red frosting for Santa Claus hats decorated with white pearl sprinkles and edible gold stars.
- Take a moment to appreciate your beautiful creations, and enjoy the deliciousness!