
Why Make This Recipe
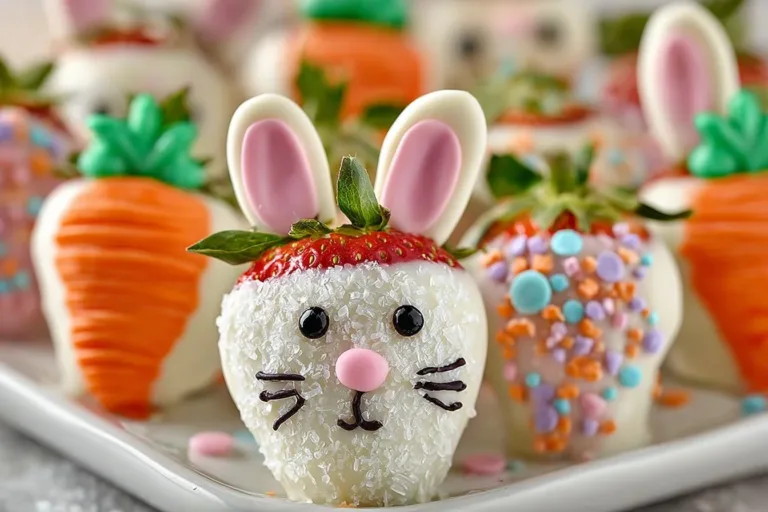
Easter Bunny Strawberries are a fun and festive treat perfect for celebrating the Easter holiday. These adorable, sweet strawberries are not only delicious but also add a playful touch to any gathering. They’re easy to make and are sure to delight both kids and adults. Plus, they are a great way to enjoy fresh fruit in a fun and creative way!
How to Make Easter Bunny Strawberries
Ingredients
- 8 strawberries
- 4 oz white melting wafers
- 1 oz black melting wafers
- 2 marshmallows
- 1 tablespoon pink sanding sugar sprinkles
- 16 candy eyeballs
- 8 heart sprinkles
- 4 oz orange melting wafers
Directions
- Rinse the strawberries and dry them very well.
- Melt the white candy wafers in the microwave at 50 percent power for 30 seconds. Stir and continue heating in 10-second increments, stirring after each time, until smooth.
- Dip the dry strawberries in the melted candy coating and place them on a piece of parchment paper.
- Cut the marshmallows in half. Then, cut slices off each half. Dip the marshmallow pieces in pink sanding sugar sprinkles.
- Use the white melted candy wafers to attach the ears to the coated strawberries.
- Attach the candy eyeballs using the white melted candy wafers.
- Melt the black candy wafers in the microwave and, using a toothpick, draw whiskers, a mouth, and teeth on the bunnies.
- Attach heart sprinkles for bunny noses using melted white candy wafers.
- For the carrot strawberries, melt the orange candy wafers in the microwave at 50 percent power for 30 seconds. Stir and continue heating in 10-second increments, stirring after each time, until smooth.
- Dip the dry strawberries in the melted orange candy coating and place them on a piece of parchment paper.
- Drizzle additional orange candy coating over the strawberries to create the look of the ridges you would see on a carrot.
- Store in the refrigerator for 2-3 days in an airtight container covered with waxed paper.
How to Serve Easter Bunny Strawberries
Serve Easter Bunny Strawberries on a fun platter or a decorative plate. You can arrange them with other spring-themed treats to create a beautiful dessert table. These lovely treats make a great centerpiece for your Easter brunch or dessert spread.
How to Store Easter Bunny Strawberries
Store the Easter Bunny Strawberries in an airtight container in the refrigerator. Make sure to cover them with waxed paper to keep them fresh. They will stay good for about 2-3 days.
Tips to Make Easter Bunny Strawberries
- Make sure to dry the strawberries well before dipping them in the candy coating to ensure a proper stick.
- Use fresh strawberries for the best flavor and appearance.
- If you don’t have pink sanding sugar, you can use regular sugar or leave the ears plain.
Variation
You can customize the decorations by using different colors of melting wafers for the candy coating. You could also try using other fruits, like bananas or apples, to create different bunny shapes.
FAQs
1. Can I use chocolate instead of melting wafers?
Yes, you can use chocolate for dipping. Just make sure it’s melted and smooth before using it.
2. How long does it take to make Easter Bunny Strawberries?
The total time to make these strawberries is about 30-40 minutes, depending on your experience level.
3. Can I make these ahead of time?
Yes, you can make them a day in advance, but for the best texture, it’s best to serve them fresh.
Easter Bunny Strawberries
Ingredients
Method
- Rinse the strawberries and dry them very well.
- Melt the white candy wafers in the microwave at 50 percent power for 30 seconds. Stir and continue heating in 10-second increments, stirring after each time, until smooth.
- Dip the dry strawberries in the melted white candy coating and place them on a piece of parchment paper.
- Cut the marshmallows in half. Then, cut slices off each half. Dip the marshmallow pieces in pink sanding sugar sprinkles.
- Use the white melted candy wafers to attach the ears to the coated strawberries.
- Attach the candy eyeballs using the white melted candy wafers.
- Melt the black candy wafers in the microwave and, using a toothpick, draw whiskers, a mouth, and teeth on the bunnies.
- Attach heart sprinkles for bunny noses using melted white candy wafers.
- Melt the orange candy wafers in the microwave at 50 percent power for 30 seconds. Stir and continue heating in 10-second increments, stirring after each time, until smooth.
- Dip the dry strawberries in the melted orange candy coating and place them on a piece of parchment paper.
- Drizzle additional orange candy coating over the strawberries to create the look of the ridges you would see on a carrot.