
Table of Contents
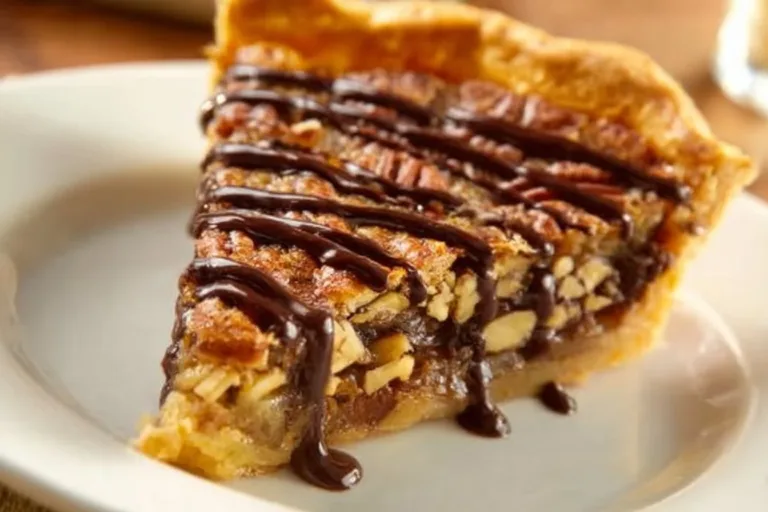
Oh, let me tell you about the first time I encountered the divine creation known as Chocolate Turtle Pie! It was a cozy family gathering, and the sweet scent of melting chocolate filled the kitchen. My dear Aunt Clara had prepared it, and as I watched her pour the rich, golden caramel over the luscious chocolate while my nose danced with the warm, nutty aroma of toasting pecans, I knew this treat was going to be something special. With its creamy filling, layered textures, and heavenly flavors, this pie quickly became the star of any dessert table, drawing everyone in with its magnetic charm. Now, whenever I whip up a Chocolate Turtle Pie, I am enveloped by that same delightful feeling of love and togetherness, and I’m sure you will feel it too. This pie doesn’t just taste like a slice of heaven; it tastes like home.
Why You’ll Love This Recipe
- Effortless Elegance: This pie is so simple to whip up that even beginner bakers will shine!
- No-Bake Beauty: It’s perfect for those warm days when you want something delicious without heating up your kitchen.
- Flavor Explosion: The combination of chocolate, caramel, and nuts creates a symphony for your taste buds.
- Crowd-Pleasing Delight: Serve it up at parties, and watch as it disappears before your eyes!
- Customizable: You can make it your own with different nuts or toppings based on your mood.
Ingredients
1 Pre-made Pie Crust
A buttery, flaky crust that saves time. You can find delicious options at your local store—no need to make it from scratch unless you’re feeling adventurous!1 Cup Semisweet Chocolate Chips
These little morsels bring rich chocolate flavor and a creamy texture that melts beautifully in the pie.1 Cup Caramel Sauce
Sweet and gooey, this sauce adds the nostalgic flavors of a caramel treat. You can buy it or make your own for an extra touch!1 Cup Heavy Cream
Whipping this cream will add lightness to your pie and a luscious mouthfeel—think whipped clouds on your dessert plate!½ Cup Mixed Nuts (Pecans or Walnuts)
Chop these up for a delightful crunch that contrasts beautifully with the creamy layers; pecans are my favorite for their buttery flavor!¼ Cup Melted Chocolate (for drizzling)
This is the finishing touch that makes your pie not only delicious but also a feast for the eyes!Whipped Cream (optional, for serving)
A dollop of fluffy whipped cream on top is always a great idea for an extra indulgent experience!
Full recipe card is below.
How to Make It
1. Preheat Your Oven
Preheat your oven to 350°F (175°C). This ensures that when your pie crust hits the oven, it bakes to golden perfection!
2. Melt Your Chocolate Chips
Melt your chocolate chips in the microwave or use a double boiler until smooth and glossy—just be sure not to overheat them! The rich, warm aroma of chocolate is the sweetest welcome to your kitchen.
3. Pour Chocolate into the Pie Crust
Carefully pour the melted chocolate into your pie crust and spread it evenly. It’s okay if it’s a little messy; the less-than-perfect look adds character!
4. Drizzle the Caramel Sauce
With a slow and steady hand, drizzle the caramel sauce over the chocolate layer. The contrasting colors and flavors promise an adventure for your senses.
5. Whip the Heavy Cream
In a mixing bowl, whip the heavy cream until stiff peaks form—this should take about 3-5 minutes. The cream should be light and airy, almost like a cloud!
6. Spread the Whipped Cream
Gently spread the whipped cream over the caramel layer. You want it to look fluffy and inviting!
7. Sprinkle Mixed Nuts
Sprinkle your chopped mixed nuts over the whipped cream, adding that delightful crunch to each slice.
8. Drizzle Melted Chocolate
Use the melted chocolate to create an elegant drizzle over the nuts. You want it to look artsy, so get creative!
9. Chill the Pie
Chill the pie in the refrigerator for at least 1 hour before serving. This sets all those decadent layers and keeps them perfectly in place when you slice!
10. Serve!
Slice, serve, and enjoy with a dollop of whipped cream if desired. Smile as you watch it disappear!
Pro Tips for Success
- Opt for Quality Ingredients: Good chocolate and fresh nuts make a world of difference in flavor.
- Be Gentle: When spreading your whipped cream, be gentle to keep it as airy as possible!
- Chill Time is Crucial: Don’t skip the chilling step; it helps the layers meld beautifully.
- Tackle the Clean Up Early: Make sure to clean as you go for a smooth cooking experience!
- Experiment with Flavors: Don’t be afraid to play around with other flavors you love!
Flavor Variations
- Chocolate Lovers: Swap the semisweet chocolate for dark chocolate for a more intense flavor.
- Nutty Twist: Try using almonds or hazelnuts for a different texture and taste.
- Seasonal Additions: Add a sprinkle of cinnamon or pumpkin spice for a cozy fall vibe.
- Healthier Alternatives: Use Greek yogurt instead of heavy cream for a lighter take—just whip it until it’s fluffy!
Serving Suggestions
This scrumptious pie pairs beautifully with a steaming cup of coffee or a glass of milk. When plating, consider drizzling some extra caramel or chocolate on the plate for a gorgeous presentation. Fresh berries add a lovely burst of color and a hint of tartness to balance the sweetness!
Make-Ahead & Storage
You can easily make this pie a day in advance; just store it in the fridge! Keep it covered with plastic wrap or in an airtight container. It will stay deliciously fresh for about 3-4 days, though I doubt it will last that long!
Leftovers
If you ever find yourself with leftovers (a rare but glorious event!), crumble pieces of the pie over vanilla ice cream. A scoop of turtle pie à la mode? Yes, please!
Freezing
Yes, it can be frozen! Just wrap it tightly in plastic wrap and aluminum foil. To thaw, simply place it in the fridge overnight before serving. Your pie will still taste scrumptious!
Reheating
For the best results, reheat individual slices in the microwave for about 10-15 seconds to slightly warm the chocolate without melting it completely. You can also serve it cold if you prefer!
FAQs
Can I make this pie gluten-free?
Absolutely! Just use a gluten-free pie crust to make it suitable for everyone.
What can I use instead of heavy cream?
You could use coconut cream for a dairy-free option, but the texture will be slightly different.
How do I store leftover pie?
Cover it tightly in the fridge, and enjoy within a few days for the best flavor and texture.
Can kids help with this recipe?
Definitely! Kids can assist with drizzling and sprinkling, turning this pie into a family affair!
Final Thoughts
As I sit back and take a moment to enjoy a slice of Chocolate Turtle Pie, I’m reminded that good food is meant to be shared. This pie is not just a dessert; it’s a labor of love, perfect for bringing friends and family together around the table. Embrace the joy of cooking and create memories with each swirl of caramel and dollop of cream. So, roll up your sleeves, gather your ingredients, and get ready for a sweet adventure in your kitchen. Happy baking, my friends!
Chocolate Turtle Pie
Ingredients
Method
- Preheat your oven to 350°F (175°C).
- Melt your chocolate chips until smooth and glossy.
- Pour the melted chocolate into your pie crust and spread evenly.
- Drizzle the caramel sauce over the chocolate layer.
- Whip the heavy cream until stiff peaks form.
- Spread the whipped cream over the caramel layer.
- Sprinkle the chopped mixed nuts over the whipped cream.
- Drizzle melted chocolate over the nuts.
- Chill the pie in the refrigerator for at least 1 hour before serving.
- Slice, serve, and enjoy!