
Table of Contents
Oh, the nostalgia that swells in my heart every time I whip up these Chocolate Cherry Cheesecake Bars! The first time I encountered this delightful concoction was during a cozy family gathering at my grandmother’s house. The sweet aroma of cherries mingling with the rich fragrance of chocolate filled the kitchen as I walked in, making my stomach rumble in anticipation. I remember peeking into the fridge, where she had stashed away a pan of glistening cheesecake bars, the glossy cherry topping shining like the sun. They were a surprise treat after a long family dinner, and the moment I took my first bite, I was transported to dessert paradise. The creamy texture, the burst of cherry sweetness, and the crumbly chocolate crust created an unforgettable harmony that I knew I had to recreate for my own family someday.
These Chocolate Cherry Cheesecake Bars are not just a recipe; they’re a celebration of flavor, nostalgia, and good times shared with loved ones. With each bite, you can almost feel the love and warmth of the kitchen wrapping around you. I simply adore making these bars for gatherings, dinner parties, or even just a quiet night in—because who doesn’t deserve a sweet treat after a long day? Trust me when I say, once you taste these bars, they’re bound to find a permanent spot in your dessert rotation!
Why You’ll Love This Recipe
- Easy to Make: With simple, straightforward steps, you’ll feel like a pro in no time!
- Crowd-Pleasing: These bars are always a hit at parties; everyone loves the chocolate-cherry combo!
- Quick to Bake: They’re ready to devour in just a little over an hour, perfect for unexpected guests.
- Decadently Flavorful: The creamy cheesecake perfectly balances the tart cherries and rich chocolate!
- Make-Ahead Friendly: Prep them ahead of time for hassle-free entertaining.
Ingredients
- 1 cup chocolate cookie crumbs: These create a delicious, crunchy crust. You can use store-bought or crush your favorite chocolate cookies—it’s therapeutic!
- 1/4 cup unsalted butter, melted: This helps bind the crust together and adds richness. Just watch that butter doesn’t sizzle too much; we want it just melted!
- 2 cups cream cheese, softened: Make sure it’s softened, so you achieve that silky smooth filling we all crave. Leave it out for about an hour before use!
- 1 cup sugar: This sweetens up the cheesecake just right. Feel free to adjust it if you prefer things less sweet.
- 2 large eggs: They help with the creamy texture. Remember to bring them to room temperature for the best results!
- 1 cup sour cream: This adds a delightful tanginess that complements the sweetness perfectly.
- 1 teaspoon vanilla extract: A splash of this magic ingredient brings everything together with a warm, cozy aroma.
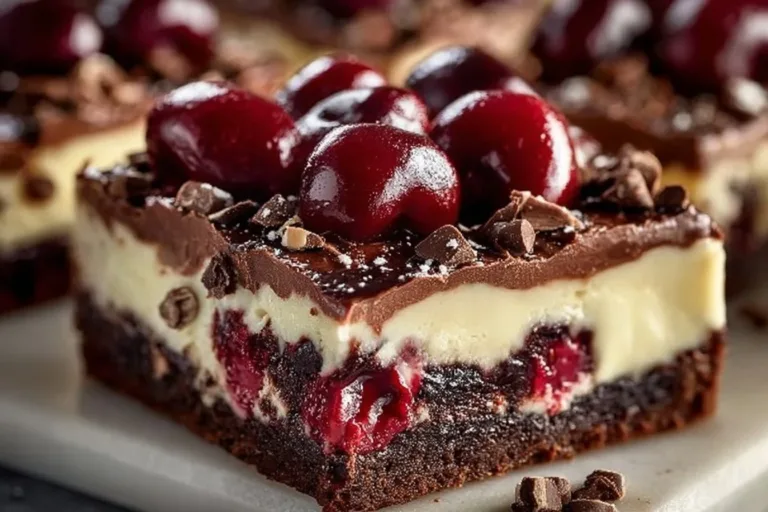
- 1 cup cherry pie filling: This is the star topping, adding a burst of juicy flavor. You can swap for fresh cherries if they’re in season!
- 1/2 cup dark chocolate chips: For that extra touch of chocolatey goodness. Semi-sweet chocolate works wonderfully too!
Full recipe card is below.
How to Make It
1. Preheat the Oven
Preheat that oven of yours to 350°F (175°C). While it’s heating up, grease a 9×9 inch baking dish. The smell of baking chocolate cheesecake filling the air is just irresistible!
2. Prepare the Crust
In a bowl, combine the chocolate cookie crumbs with the melted butter. The mixture should hold together like moist sand. Firmly press it into the bottom of the baking dish to form a sturdy crust. This crust will be your blissful support for all that creamy cheesecake goodness!
3. Beat the Cream Cheese and Sugar
In a mixing bowl, beat together the softened cream cheese and sugar until it’s all nice and smooth—just like a fluffy cloud! This step helps incorporate air, making your cheesecake bars delightfully light.
4. Add the Eggs
Add in the eggs, one at a time, mixing well after each addition. It should be creamy and oh-so-inviting! Just be sure to scrape down the sides for even mixing. We want every spoonful to be perfect!
5. Stir in Sour Cream and Vanilla
Stir in the sour cream and vanilla extract until everything is well combined. The vanilla aroma will wrap around you like a cozy blanket!
6. Pour the First Layer
Pour half of that luscious cream cheese mixture over the crust. The buttery crumb base is just waiting to be cloaked in cheesecake delight!
7. Add Cherry Pie Filling
Now, spoon the cherry pie filling over the cream cheese layer. The vibrant red cherries contrast beautifully against the creamy backdrop. Drizzle with joy!
8. Top with Cream Cheese Mixture
Pour the remaining cream cheese mixture over the cherries, making sure to spread it evenly. Top it off with dark chocolate chips that will melt ever-so-slightly while baking. Those little chocolatey spots are sure to make your heart sing!
9. Bake
Pop the baking dish in the oven and bake for 30-35 minutes or until the center is set. The aroma of baking chocolate and cherries will fill your kitchen—what a lovely scent!
10. Cool and Chill
Let the bars cool for a bit, then chill in the refrigerator for at least 4 hours before slicing them into luscious bars. This is where patience pays off, but trust me, it’s absolutely worth the wait!
Pro Tips for Success
- Room Temperature Ingredients: Always use room temperature cream cheese and eggs for a smoother filling.
- Don’t Overmix: Overmixing after adding the eggs can lead to cracks, so mix just until combined.
- Use Parchment Paper: Lining your baking dish with parchment makes for easy removal and clean-up!
- Cool Gradually: Allow the bars to cool to room temperature before chilling them for the best texture.
Flavor Variations
- Fruit Swaps: Substitute the cherry pie filling for blueberry or raspberry for a fun twist.
- Spice It Up: Add a pinch of cinnamon or almond extract to the cheesecake batter for a unique flavor profile.
- Nutty Crunch: Incorporate crushed nuts like pecans or walnuts into the crust for an extra crunch!
Serving Suggestions
Serve your decadent bars on a pretty plate, maybe with a dollop of whipped cream and a sprinkle of chocolate shavings on top for that elegant touch. Pair them with a hot cup of chocolate or a glass of sweet red wine. Trust me, it’s an amazing combination!
Make-Ahead & Storage
You can prep these bars a day or two in advance. Just store them covered in the fridge once they’re fully chilled. They’ll last up to a week, but I doubt they’ll stick around that long!
Leftovers
If you happen to have leftovers (what a rarity!), crumble them over vanilla ice cream for an instant cherry chocolate parfait treat!
Freezing
These bars freeze beautifully! Wrap tightly in plastic wrap, then foil, and they’ll keep well for up to 3 months. To thaw, simply place them in the refrigerator overnight.
Reheating
While these bars are best enjoyed chilled, if you desire some warmth, pop them in the oven at 300°F (150°C) for about 10 minutes. You can also microwave them for 10-15 seconds, but watch out—the chocolate can get melty!
FAQs
Can I use fresh cherries instead of pie filling?
Absolutely! Just pit and chop them up, and scatter them over your cream cheese layer.
How do I know when the cheesecake is done?
The edges should be set, but the center can be slightly jiggly. It will firm up as it cools!
Can I make these bars gluten-free?
Yes! Use gluten-free chocolate cookies for the crust, and you’re all set!
Could I use Greek yogurt instead of sour cream?
Sure thing! It’ll still give you that creamy texture with a nice tang.
Final Thoughts
As you embark on your adventure to create these Chocolate Cherry Cheesecake Bars, know that love is in every step. Whether enjoyed at a family gathering or savored quietly on a Wednesday evening, these bars are sure to put a smile on your face and warmth in your heart. So put on your apron, crank up your favorite tunes, and let’s get baking! Until next time, keep vibing and cooking with love!
Happy baking, my sweet friends! 🍒❤️
Full Recipe Card:
- Chocolate Cookie Crust
- Creamy Cheesecake Filling with Cherries and Dark Chocolate Chips
- One magical dessert!
Chocolate Cherry Cheesecake Bars
Ingredients
Method
- Preheat the oven to 350°F (175°C) and grease a 9×9 inch baking dish.
- In a bowl, combine chocolate cookie crumbs and melted butter; press into the bottom of the baking dish to form the crust.
- In a mixing bowl, beat together softened cream cheese and sugar until smooth.
- Add eggs one at a time, mixing well after each addition; scrape down sides for even mixing.
- Stir in sour cream and vanilla extract until well combined.
- Pour half of the cream cheese mixture over the crust.
- Spoon cherry pie filling over the cream cheese layer.
- Pour the remaining cream cheese mixture over the cherries, and top with dark chocolate chips.
- Bake for 30-35 minutes or until the center is set; let cool, then chill in the refrigerator for at least 4 hours before slicing.