
Table of Contents
Oh, sweet memories! It was the summer of my childhood when my dear Aunt Molly, who was the life of every family gathering, unveiled her famous Cherry Cheesecake Brownies. The sun was shining, and the air was filled with the sweet scent of cherries mingling with rich cream cheese. I can still remember the delight of biting into that luscious brownie, the smooth cheesecake layer melting on my tongue, contrasted by the slight tartness of the cherries. Those summertime family barbecues became our little heaven on earth, filled with laughter, love, and of course, Aunt Molly’s delicious creations.
As I grew older, I found myself craving that same joy and comfort in my own kitchen. And guess what? I finally recreated that fabulous recipe with a few of my twists! Each time I bake these Cherry Cheesecake Brownies, I’m transported back to those blissful days—the warm light streaming through the kitchen window, the sound of my family’s chatter in the background, and the thrill of sharing a sweet treat that brings everyone together. Trust me, you and your loved ones are about to embark on a cozy and delightful adventure with this recipe!
Why You’ll Love This Recipe
- Simple Ingredients: You’ll likely have most of these pantry staples on hand already!
- Perfect Texture: The fudgy brownie base with creamy cheesecake on top is the ultimate texture combo.
- Crowd-Pleasing Delight: Ideal for gatherings or just a cozy night in — everyone will be asking for seconds!
- Quick Preparation: Whip these up in just about an hour, so you won’t have to wait long to indulge.
- Versatile Flavors: Easy to make variations depending on season or preferences.
- Easy to Store: Keep them fresh for days or enjoy the joy of sharing!
Ingredients
- Brownie Mix (or homemade): This is the base of our decadent treat; feel free to use your favorite mix or make it from scratch for extra love!
- Eggs: Essential for binding; they give our brownies that rich, moist crumb.
- Butter: A key ingredient for a fudgy texture. Melt it to lock in that scrumptious, gooey goodness!
- Cream Cheese: The star of our cheesecake layer! Softened to give you that creamy texture.
- Sugar: Sweetens and balances the tang of the cream cheese for the perfect bite.
- Vanilla Extract: Adds warmth and comfort; make sure it’s pure for the best flavor.
- Cherries (fresh or canned): Add that delightful fruitiness! If using canned, don’t forget to drain well.
Full recipe card is below.
How to Make It
Step 1: Preheat and Prepare
Preheat your oven to 350°F (175°C), and line a 9×9-inch baking pan with parchment paper. This makes for easy removal so you can dive right into those brownies!
Step 2: Mix the Brownie Base
In a large bowl, combine the brownie mix with melted butter and eggs. Give it a good stir until everything is blended and you spot a few lumps (the best kind of lumps!)—don’t overmix! The rich chocolatey aroma will fill your kitchen, and you might just find yourself sneaking a taste.
Step 3: Spread It Out
Pour the brownie batter into the prepared pan, smoothing it to the edges with a spatula. Take a moment to marvel at how beautiful this divine chocolate mixture looks!
Step 4: Create the Cheesecake Layer
In a separate bowl, beat the softened cream cheese, sugar, and vanilla extract together until fluffy and creamy. The smell is simply irresistible! Just imagine the smoothness of that cream cheese as you stir—how delightful it will be layered on top.
Step 5: Layer and Glitter
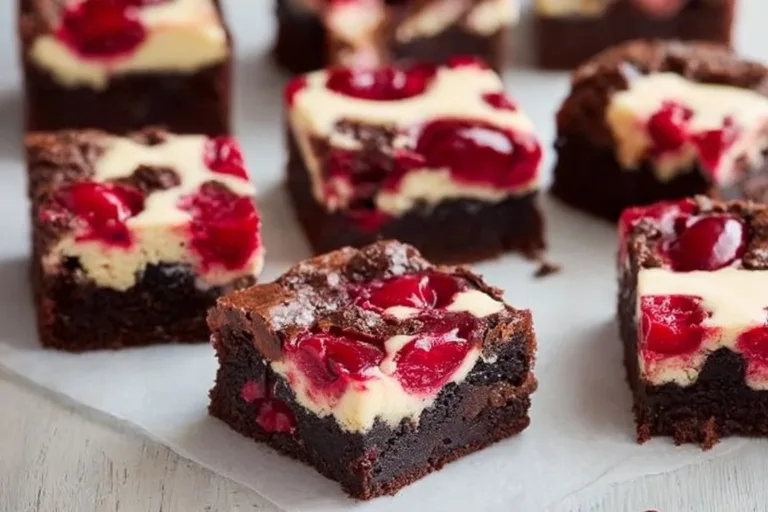
Carefully dollop the cheesecake mixture over the brownie batter, spreading it gently. Drizzle those lovely cherries on top, scattering them like jewels. You might want to take a moment to appreciate how gorgeous your creation looks before it goes into the oven!
Step 6: Bake
Pop it in the oven for 30-35 minutes. As it bakes, the delightful scent of chocolate and cherries will waft through your kitchen, making everyone eager to know what you’re up to.
Step 7: Cool and Cut
Once baked, let it cool in the pan for at least 10 minutes. (Trust me, patience is key here!) Lift the brownies out using the parchment paper and let them cool completely on a wire rack before cutting into squares.
Pro Tips for Success
- Softening Cream Cheese: Forgetting to leave it out? Microwave it for about 15 seconds to soften it quickly.
- Don’t Overmix: When mixing, stop as soon as it comes together — this ensures a lighter texture.
- Chill for Neat Cuts: If you’re looking for perfectly cut squares, chill the brownies for 30 minutes before cutting.
- Try Different Chocolate: Swapping dark chocolate brownie mix for a milk chocolate mix offers a delightfully different experience!
Flavor Variations
- Berry Bliss: Swap cherries for raspberries or blueberries for a summery twist!
- Spice It Up: Add a sprinkle of cinnamon or nutmeg to the cheesecake layer for a warm, cozy flavor.
- Nutty Crunch: Toss in some chopped pecans or walnuts for texture and an added layer of flavor.
Serving Suggestions
These brownies are perfect served warm, drizzled with chocolate sauce, or accompanied by a scoop of vanilla ice cream! Plating on a fun dessert plate, perhaps garnished with a sprinkle of fresh cherries on top, turns them into an eye-catching treat. Pair with a glass of chilled milk, coffee, or even a dessert wine to elevate your tasting experience.
Make-Ahead & Storage
You can definitely prepare these Cherry Cheesecake Brownies a day ahead—they keep beautifully in an airtight container for up to 4 days on the counter. Just remember to let them cool completely before storing!
Leftovers
If you somehow have leftovers (rare, I know!), try crumbling them over yogurt for a decadent breakfast, or mix them into a milkshake for a delicious dessert twist!
Freezing
Yes, these brownies can be frozen! Simply wrap them tightly in plastic wrap and then a layer of aluminum foil. They’ll be happy in the freezer for up to three months. When you’re ready to enjoy, let them thaw in the fridge overnight.
Reheating
For an extra little something, gently warm a square in the oven at 350°F (175°C) for about 5-10 minutes or in the microwave for 15-20 seconds — just enough to get that creamy cheesecake layer dreamy again!
FAQs
Can I use a different fruit for this recipe?
Absolutely! Feel free to swap cherries for your favorite fruit. Raspberries or blueberries work wonderfully as well!
Can I make this recipe gluten-free?
Yes! Just use a gluten-free brownie mix to fit your dietary needs and enjoy!
How can I make this more chocolatey?
Mix in some chocolate chips into the brownie layer! A little extra chocolate never hurt anyone, right?
What’s the best way to cut brownies?
For clean cuts, use a sharp knife that’s been heated in hot water, then wiped dry. It’ll slice through easily!
Final Thoughts
Oh, dear friends, it warms my heart to share this delightful Cherry Cheesecake Brownies recipe with you! There’s something so incredibly special about lifting your loved ones up with sweet treats baked from the heart. So, get your aprons on and let those memories serve as inspiration in your cozy kitchen. I can’t wait for you to experience the love that comes with each delicious bite. Happy baking, and don’t forget to share your creations with those you cherish. Until next time, keep vibing in your culinary adventures!
With warmth and sweetness,
Chef Emily
vibingRecipes.com
Cherry Cheesecake Brownies
Ingredients
Method
- Preheat your oven to 350°F (175°C) and line a 9×9-inch baking pan with parchment paper.
- In a large bowl, combine the brownie mix with melted butter and eggs. Stir until blended with a few lumps.
- Pour the brownie batter into the prepared pan, smoothing it to the edges.
- In a separate bowl, beat the softened cream cheese, sugar, and vanilla extract until fluffy and creamy.
- Dollop cheesecake mixture over brownie batter and scatter cherries on top.
- Bake for 30-35 minutes. Allow the delightful scent to waft through your kitchen.
- Let it cool in the pan for at least 10 minutes, then cool completely on a wire rack before cutting into squares.