
Table of Contents
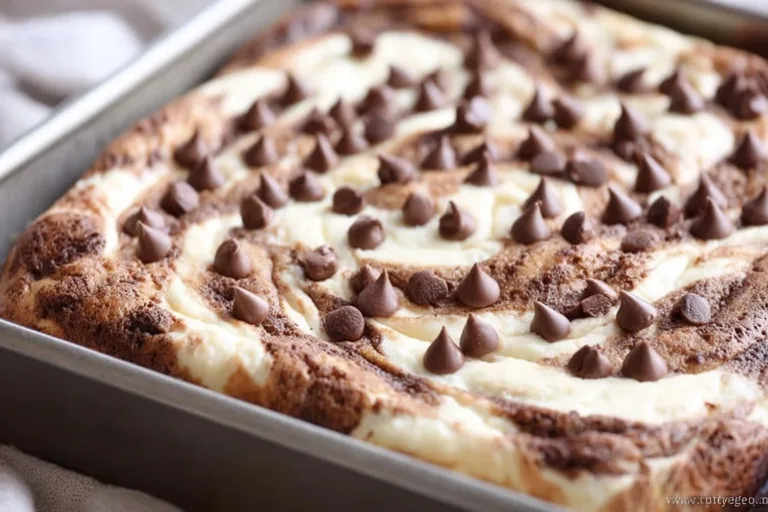
Picture this: it’s a rain-soaked Sunday afternoon, and the scent of warm chocolate wafts through the kitchen, mingling with the sweet, creamy aroma of cheesecake. This was the magic moment when I first discovered the joy of Cheesecake Marble Squares. Imagine my delight, taking my first bite—rich, velvety brownie complements the luscious creaminess of the cheesecake, like a warm hug for your taste buds! These delightful squares bring a sense of warmth and joy that can brighten even the gloomiest of days.
This recipe has become a cherished staple in my home, not just for the heavenly blend of flavors and textures but also for the memories it creates. Friends gathering around the table, faces lighting up upon seeing a platter filled with these beautiful squares, laughter mixing with the soft sound of forks clinking against plates—that’s the bliss I treasure. Trust me, once you try these Cheesecake Marble Squares, they’ll become your go-to treat for family gatherings, cozy nights in, or a sweet indulgence just because!
Why You’ll Love This Recipe
- Easy to Make: With simple ingredients and straightforward steps, baking becomes a delightful breeze!
- Quick Baking Time: Ready to indulge in under 30 minutes—perfect for those spontaneous dessert cravings!
- Flavorful Harmony: The rich chocolatey brownie base and the creamy cheesecake topping create an exquisite flavor dance in each bite.
- Crowd-Pleasing Delight: Guaranteed to impress friends and family—no one can resist these sweet squares!
- Versatile Treat: Enjoy them plain, or jazz them up with your favorite toppings for a little extra flair.
- Comfort in Every Bite: The cozy aroma and taste transport you to that warm kitchen filled with love.
Ingredients
- 1 cup brown sugar: Adds a deep, caramel-like sweetness that’s just divine!
- 1/2 cup granulated sugar: Balances the flavors and contributes to the perfect texture.
- 1/2 cup unsalted butter, melted: Keeps the squares rich and moist; melted gives a nice buttery aroma.
- 1 teaspoon vanilla extract: A splash of warmth that pulls everything together beautifully.
- 2 large eggs: The secret to a fluffy, cake-like texture—don’t skip them!
- 1 cup all-purpose flour: Creates the base for the brownies, helping them rise just right.
- 1/4 cup cocoa powder: Deepens the chocolate flavor, making each bite indulgently rich.
- 1/2 teaspoon baking powder: A little leavening magic to give your squares the perfect lift.
- 1/4 teaspoon salt: Balances sweetness and enhances all the flavors.
- 8 oz cream cheese, softened: The star of the cheesecake layer—super creamy and dreamy!
- 1/4 cup granulated sugar (for cheesecake): Sweetens that luscious creaminess you’re going to love.
- 1 egg (for cheesecake): Helps the cheesecake layer set and keeps it smooth and creamy.
- 1/2 teaspoon vanilla extract (for cheesecake): Because more vanilla is always a good idea!
Full recipe card is below.
How to Make It
1. Preheat and Prepare
Preheat your oven to 350°F (175°C) and grease a square baking pan. The smell of the heating oven will coax everyone into the kitchen—anticipation is part of the magic!
2. Mix the Brownie Batter
In a bowl, whisk together the brown sugar, granulated sugar, melted butter, and vanilla extract until smooth. The blend should be glossy and inviting! Next, add your eggs—one at a time—mixing well after each addition. You’ll see it get all fluffy!
3. Fold in the Dry Ingredients
Gradually fold in the flour, cocoa powder, baking powder, and salt. Don’t overmix—it’s okay if there are a few lumps; they add character!
4. Create the Cheesecake Filling
In another bowl, beat together the cream cheese, 1/4 cup granulated sugar, 1 egg, and 1/2 teaspoon vanilla extract until smooth. The creamy texture should make you consider diving right in with a spoon!
5. Layer the Batter
Pour half of the brownie batter into your prepared pan. Then add dollops of the cheesecake mixture on top. Swirl gently with a knife to create a marbled effect—it’s like painting with food!
6. Finish With Batter
Pour the remaining brownie batter over the cheesecake layer and smooth it out. Gently entice those layers to mingle; this will create stunning stripes when cut!
7. Bake
Bake for 25-30 minutes, or until a toothpick comes out clean. The aroma will be irresistible—try not to sneak too many smells!
8. Cool and Serve
Let cool before cutting into squares. It’s tough, I know, but patience pays off for that perfect slice!
Pro Tips for Success
- Room Temperature Ingredients: Make sure your cream cheese and eggs are at room temperature for a smooth filling.
- Don’t Overmix: Overmixing the batter will lead to dense squares—mix just until combined!
- Marbling Technique: Use a toothpick or a knife to swirl the cheesecake filling; don’t go overboard—less is more!
- Timing is Key: Keep an eye on your squares towards the end of baking; check for doneness with a toothpick for best results.
- Cool Completely: Allow them to cool fully before cutting to achieve clean lines and easy serving.
Flavor Variations
- Nutty Twists: Add chopped nuts, such as walnuts or pecans, to the brownie batter for delightful crunch.
- Seasonal Swaps: Mix in some pumpkin puree in the cheesecake layer during the fall for a seasonal spin!
- Spice it Up: Add a pinch of cinnamon or espresso powder to the brownie batter for a flavor boost.
Serving Suggestions
Serve these beauties warm with a dollop of whipped cream on top or a scoop of vanilla ice cream by the side for an extra dreamy treat! A cup of hot coffee or a glass of cold milk pairs beautifully, enhancing the layers of flavor.
Make-Ahead & Storage
You can prepare the batter a day in advance and bake when needed! It’s best stored in an airtight container in the fridge for about 4-5 days, keeping them fresh and delicious.
Leftovers
Try crumbling any leftovers over yogurt for a quick breakfast or snack, or create a decadent parfait with layers of cheesecake squares, whipped cream, and berries!
Freezing
Absolutely, Cheesecake Marble Squares can be frozen! Wrap them tightly in plastic wrap and then in aluminum foil. They’ll keep well for about 3 months. To thaw, simply place them in the fridge overnight.
Reheating
For the best results, reheat squares in a skillet over low heat just until warm or pop them in the oven at 350°F for a few minutes. A microwave also works in a pinch—just keep it brief to avoid drying out!
FAQs
Can I use low-fat cream cheese?
Yes! Low-fat cream cheese works just as well, although it may be a bit less creamy.
What if I don’t have cocoa powder?
You could substitute it with carob powder for a different flavor profile!
Can I make these gluten-free?
Absolutely! Swap the all-purpose flour for a 1:1 gluten-free blend, and you’ll be all set.
How do I know when they’re done?
They’re done baking when the edges look set, and a toothpick inserted in the center comes out with a few moist crumbs.
Final Thoughts
Baking has a special way of bringing people together, filling our hearts and homes with warmth. Cheesecake Marble Squares are not just a delicious treat; they’re an invitation to gather, share laughter, and create moments to cherish. I hope you enjoy making and sharing these squares as much as I do! So, roll up those sleeves and let’s create some cozy magic in the kitchen. Happy baking, friends! 🍰💖
Cheesecake Marble Squares
Ingredients
Method
- Preheat your oven to 350°F (175°C) and grease a square baking pan.
- In a bowl, whisk together the brown sugar, granulated sugar, melted butter, and vanilla extract until smooth.
- Add your eggs, one at a time, mixing well after each addition.
- Gradually fold in the flour, cocoa powder, baking powder, and salt.
- In another bowl, beat together the cream cheese, 1/4 cup granulated sugar, 1 egg, and 1/2 teaspoon vanilla extract until smooth.
- Pour half of the brownie batter into your prepared pan.
- Add dollops of the cheesecake mixture on top and swirl gently with a knife.
- Pour the remaining brownie batter over the cheesecake layer and smooth it out.
- Bake for 25-30 minutes, or until a toothpick comes out clean.
- Let cool before cutting into squares.