
Table of Contents
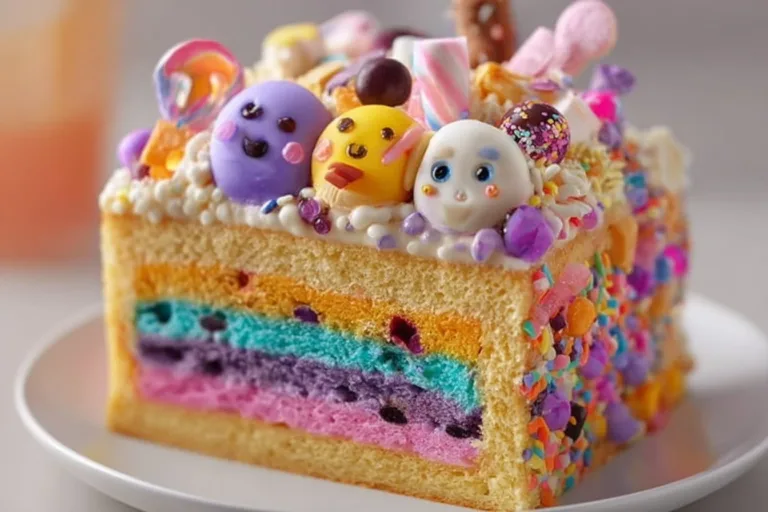
You know those moments in the kitchen when everything just feels like magic? I’ll never forget the first time I stumbled upon the delightful chaos of Chaos Cake With Silly Decorations. I was having one of those days—rainy, gray skies hanging low, and I just wasn’t in the mood for anything serious. So, I decided to concoct a cake that embraced the whimsical spirit of playfulness. I started off with a simple vanilla cake and began tossing in ideas for colorful frosting, sprinkles, and silly decorations. The laughter that erupted as we piled gummy candies, cotton candy, and mini marshmallows on top was the highlight of our afternoon!
As the cake baked, the kitchen filled with a deliciously sweet aroma that coaxed everyone over. When it finally came time to taste this colorful creation, every bite was a tour of flavor—fluffy cake enveloped in creamy frosting, with the crunch of sprinkles and the chewy burst from a gummy bear, all mingling blissfully. The beauty of this cake is not just in its flavors but also in its fun, carefree vibe that brings loved ones together. Trust me, you’ll love it too!
Why You’ll Love This Recipe
- Easy to Make: Perfect for budding bakers of any skill level.
- Quick and Fun: It’ll be ready for dressing up in just a couple of hours, making for a delightful afternoon project.
- Creative Outlet: Unleash your imagination with silly decorations that will entertain everyone!
- Crowd-Pleasing: Kids and adults alike will adore this whimsical cake, making it ideal for parties or family gatherings.
- Deliciously Versatile: Use any flavors or colors that speak to you!
Ingredients
2 ½ cups (315 g) all-purpose flour
For the base! A versatile choice that gives your cake that classic fluffy texture.2 teaspoons baking powder
This little power booster helps your cake rise beautifully!½ teaspoon baking soda
Adds fluff and lifts the cake to new heights!½ teaspoon salt
Just a pinch to balance out the sweetness; every great cake needs it!1 cup (225 g) unsalted butter, softened
Key for creaming with sugar to create that light, airy texture you love.1 ¾ cups (350 g) granulated sugar
Sweetness is essential, and this will help your cake get that lovely golden crust!4 large eggs
Binding it all together and adding a rich flavor—those eggs are magic!2 teaspoons vanilla extract
The heart and soul of any cake; always opt for pure vanilla for the best flavor!1 cup (240 ml) whole milk
Moisture is key for a tender cake; whole milk helps your cake stay rich and creamy!Zest of 1 lemon (optional)
A hint of zing to take your cake to the next level!1 cup (225 g) unsalted butter, softened (for frosting)
The base of our colorful frosting—bring on the creaminess!4 cups (480 g) powdered sugar, sifted
To sweeten and create that perfect frosting texture!2–3 tablespoons (30–45 ml) milk
Adust to achieve the desired frosting consistency. Cozy vibes here!2 teaspoons vanilla extract
More flavor magic—we just can’t get enough!Food coloring gels (various colors)
These bright hues will help your cake radiate joy!Assorted sprinkles, mini marshmallows, candy eyes, gummy candies, chocolate chips, wafer sticks, cotton candy
Fun toppings that will bring your cake to life! Pile them high for ultimate silliness!
Full recipe card is below.
How to Make It
Step 1: Preheat and Prepare
Preheat your oven to 350°F (175°C). Grease and flour two 9-inch round cake pans to ensure smooth releasing.
Step 2: Whisk Dry Ingredients
In a medium bowl, whisk together the flour, baking powder, baking soda, and salt. Feel the rustic grains sift through your fingers—it’s a wonderful start!
Step 3: Cream Butter and Sugar
In a large bowl, cream the softened unsalted butter and granulated sugar with an electric mixer until light and fluffy, about 3 minutes. You’ll know it’s ready when it’s pale and inviting!
Step 4: Add Eggs and Flavor
Add eggs one at a time, ensuring each is well beaten before adding the next. Mix in the vanilla extract and lemon zest, if using. That sweet scent is just heavenly!
Step 5: Combine Wet and Dry
Alternately incorporate the flour mixture and milk into the butter mixture, beginning and ending with the flour. Mix only until just combined—this isn’t a race; gentle is best!
Step 6: Bake to Perfection
Divide the batter evenly between the two prepared cake pans. Bake for 30–35 minutes, or until a toothpick inserted into the center emerges clean. The aroma as it bakes is simply blissful!
Step 7: Cool It Down
Allow the cakes to cool in their pans for 10 minutes. Then, invert them onto a wire rack to cool completely.
Step 8: Make the Frosting
Beat the softened butter until smooth. Gradually add the sifted powdered sugar, followed by milk and vanilla extract, beating until the frosting is light and fluffy.
Step 9: Color the Frosting
Divide the frosting into multiple bowls and tint each with a different food coloring gel. Think of the vibrant colors exploding like a rainbow in your kitchen!
Step 10: Assemble the Cake
Place one cooled cake layer on a serving plate. Spread a layer of colored frosting over the top. Position the second cake layer atop the first, then frost the entire cake with a base color.
Step 11: Get Creative!
Now, for the fun part! Use the remaining colored frosting to pipe playful designs, shapes, or swirls. Adorn with assorted sprinkles, candy eyes, mini marshmallows, gummy candies, wafer sticks, chocolate chips, and cotton candy as desired. Go wild; have fun!
Pro Tips for Success
- Room Temperature Ingredients: Ensure your eggs and butter are at room temperature for maximum fluffiness.
- Don’t Overmix: Mix gently once you combine wet and dry ingredients to keep the cake light.
- Test Bakes: Remember, ovens vary. Always use a toothpick to check for doneness and avoid over-baking!
- Let It Cool Completely: Cooling your cakes completely before frosting will prevent any melty mess—patience pays off!
- Embrace Creativity: Decorating is where you shine! Let your imagination lead you—there are no rules in chaos!
Flavor Variations
- Chocolate Delight: Substitute 1 cup of all-purpose flour with cocoa powder for a rich chocolate cake.
- Seasonal Spices: Add cinnamon or nutmeg for a warm autumn twist or even sprinkles of peppermint for winter.
- Fruity Twist: Fold in fresh berries or crushed pineapple before baking for a fruity surprise!
Serving Suggestions
Serve slices with a drizzle of chocolate or caramel sauce—oh my goodness, that’s indulgent! Pair with a warm cup of milk or a scoop of vanilla ice cream for an extra treat.
Make-Ahead & Storage
You can bake the cakes a day ahead and store them in an airtight container at room temperature. For decorated cakes, it’s best to keep them in the fridge if you’ll be serving them the next day. They last up to 3 days—if they last that long, that is!
Leftovers
Turn leftover cake into cake pops! Just crumble the cake, mix with frosting, roll into balls, and coat with chocolate.
Freezing
Yes! You can freeze the unfrosted layers wrapped tightly in plastic wrap for up to 3 months. To thaw, move them to the fridge overnight or let them sit at room temperature for a bit before frosting.
Reheating
If you enjoy warm cake (and who doesn’t?), pop a slice in the microwave for about 10-15 seconds—or heat in a skillet over low heat, covered, until warm. A little ice cream on top? Divine!
FAQs
Can I use gluten-free flour?
Absolutely! Use a 1:1 gluten-free blend, and your chaos cake will still be magical!
What if I don’t have cake pans?
You can use a glass baking dish. Just adjust the baking time accordingly; larger pans may need more time!
Is the frosting too sweet?
If it’s too sweet for your taste, mix in a bit of cream cheese for a tangy kick that balances the sweetness beautifully!
Can I skip the decorations?
Of course! Even a simple frosting works its charm, but the decorations add the whimsical touch that makes this cake truly a delight.
Final Thoughts
As we wave goodbye to the kitchen chaos and savory scents, know that this Chaos Cake With Silly Decorations is more than just dessert. It’s a joyful reminder that baking doesn’t have to be perfect; it just has to be loved. Gather your family, unleash your creativity, and dive into the hilarity of decoration! May your kitchen always be filled with laughter, love, and slices of cake! Until next time, happy baking from your friend in the kitchen, Chef Emily!
Chaos Cake With Silly Decorations
Ingredients
Method
- Preheat your oven to 350°F (175°C). Grease and flour two 9-inch round cake pans.
- In a medium bowl, whisk together the flour, baking powder, baking soda, and salt.
- In a large bowl, cream the softened butter and granulated sugar until light and fluffy, about 3 minutes.
- Add eggs one at a time, mixing well after each addition. Then, mix in the vanilla extract and lemon zest if using.
- Alternately incorporate the flour mixture and milk into the butter mixture, starting and ending with flour.
- Divide the batter evenly between the prepared pans. Bake for 30–35 minutes or until a toothpick comes out clean.
- Cool the cakes in their pans for 10 minutes, then invert them onto a wire rack to cool completely.
- Beat the softened butter until smooth. Gradually add the sifted powdered sugar, then milk and vanilla extract, beating until light and fluffy.
- Divide the frosting into bowls and tint each with food coloring.
- Place one cooled cake layer on a serving plate and spread a layer of colored frosting on top.
- Top with the second cake layer, then frost the entire cake with a base color.
- Use the remaining colored frosting to pipe playful designs and adorn with sprinkles, candy eyes, marshmallows, and other toppings.