

Table of Contents
Oh, my friends, let me take you back to a delightful afternoon in my cozy kitchen, where I first stumbled upon the idea for these delectable Black Forest Cheesecake Bars. The scent of melting chocolate wafted through the air as I rummaged through my pantry, trying to concoct something irresistible. I had some luscious cherries left over from a summer baking spree, and it hit me—why not combine the rich flavors of Black Forest cake with smooth, creamy cheesecake?
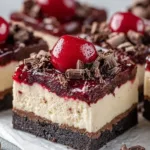
As I layered the chocolatey cookie crust with luscious cream cheese filling and topped it off with that beautiful cherry pie filling, I could hardly contain my excitement. The moment I took a bite, I was transported to a world of velvety smoothness and a tart cherry pop that danced on my tongue. The combination of flavors and textures was nothing short of heavenly! I knew right then and there that everyone needed this recipe in their lives. And I promise, once you try these bars, you’ll be inviting friends over just to share a slice (or two). Get ready for cozy kitchen vibes and smiles all around!
Why You’ll Love This Recipe
- Easy to Make: With just a few simple steps, you’ll be on your way to dessert bliss.
- Quick Prep Time: You can whip these up in no time, perfect for last-minute gatherings!
- Crowd-Pleasing: Everyone loves cheesecake and cherries; this bar dessert is sure to impress.
- Flavor Fusion: Combining chocolate and cherries offers a treat for the senses—rich, sweet, and tart all in one bite.
- Perfect for Any Occasion: Whether it’s a cozy gathering or a celebration, these bars can fit right in.
Ingredients
1 ½ cups chocolate cookie crumbs (such as Oreo, without filling)
These form our delicious base with a deep chocolate flavor—perfectly indulgent!¼ cup unsalted butter, melted
This will help bind the cookie crumbs together for a sturdy crust that won’t crumble (too much)!2 tbsp granulated sugar
A little bit of sweetness to enhance the chocolatey goodness in your crust!16 oz cream cheese, softened
The star of the show! This gives our bars that rich, creamy texture we all dream about.½ cup granulated sugar
This ensures your cheesecake filling is perfectly sweet.2 large eggs
These help our filling set beautifully, lending a luxurious mouthfeel.1 tsp vanilla extract
Just a splash will round off the flavors and add warmth to every bite!¼ cup sour cream (for a creamy texture)
This will enhance the creaminess and give your cheesecake bars a lovely tang.Pinch of salt
Salt balances out the sweetness, making each bite even more delicious!1 can (21 oz) cherry pie filling
An easy way to introduce that charming cherry flavor—no pitting necessary!Optional: dark chocolate shavings or curls for garnish
A touch of elegance that adds a delightful crunch!Optional: whipped cream for serving
Because who could resist a dollop of cream on top?
Full recipe card is below.
How to Make It
Preheat Your Oven
First things first! Preheat your oven to 325°F (160°C). This will ensure that you’re ready to bake as soon as your batter is mixed.
Line Your Baking Pan
Line a square baking pan with parchment paper, leaving some overhang (this is key for easy lifting later!). The parchment will help your bars come out cleanly, and trust me, you’ll want every bit of these decadent treats!
Make the Crust
In a bowl, mix together the chocolate cookie crumbs, melted butter, and granulated sugar until combined and crumbly. Pour this mixture into the prepared pan, pressing it firmly with the back of a measuring cup (or your hands) to form an even layer.
Bake the Crust
Pop that crust into the preheated oven for about 10 minutes. You should begin to smell that delightful chocolate aroma filling your kitchen—pure bliss!
Prepare the Filling
While the crust cools a bit, let’s whip up the filling! In a large bowl, beat the softened cream cheese and sugar together until smooth and creamy. Add in the eggs one at a time, mixing well after each addition. Then, stir in the vanilla extract, sour cream, and a pinch of salt until fully combined.
Pour and Spread
Gently pour the cream cheese mixture over your cooled crust and spread it evenly with a spatula. This is going to be luscious, I promise!
Bake the Cheesecake Bars
Bake in the oven for about 25-30 minutes or until the edges are set and the center is slightly jiggly. You want it to look lovely and creamy!
Cool Down and Top
Let the bars cool in the pan for about 10 minutes before spreading the cherry pie filling on top. Then, refrigerate for at least 2 hours (or overnight if you can resist!) to let those flavors meld together.
Slice and Enjoy
Once chilled, use the parchment overhang to lift the bars out of the pan and slice them into squares.
Pro Tips for Success
- Room Temperature Ingredients: Make sure your cream cheese is softened to room temperature to avoid lumps.
- Don’t Overmix: Once you add your eggs, mix just until combined to keep your bars from cracking.
- Chill Time is Key: Don’t skimp on chilling—this allows the cheesecake to set properly for easy slicing.
- Garnish Creatively: Get playful with toppings like whipped cream or dark chocolate shavings for a fancy touch!
Flavor Variations
- Berry Bliss: Swap the cherry pie filling for raspberry or blueberry for a different fruity twist.
- Nutty Crunch: Add crushed nuts to the crust for added texture and flavor.
- Seasonal Spices: A touch of cinnamon or nutmeg in the cream cheese filling can create a cozy fall vibe!
Serving Suggestions
Serve your Black Forest Cheesecake Bars chilled, perhaps with a light dusting of powdered sugar on top for a touch of elegance. A cup of hot coffee or a cheeky glass of red wine would complement the flavors wonderfully while you sink into your favorite chair!
Make-Ahead & Storage
You can prepare these bars a day in advance! Just keep them stored in the fridge, tightly covered, to maintain their freshness. They will last up to a week, but I doubt they’ll hang around long once you share them!
Leftovers
If you find yourself with leftovers, try crumbling them over vanilla ice cream for a delightful dessert mash-up.
Freezing
Absolutely! These bars can be frozen for up to 3 months. Just wrap individual squares in plastic wrap, then in foil to prevent freezer burn. To thaw, place them in the refrigerator overnight.
Reheating
For optimal texture, it’s best to enjoy these cold. If you’d like to warm them up slightly, it’s best to use the microwave in short bursts (around 10-15 seconds), careful not to overheat.
FAQs
Can I use a different type of cookie for the crust?
Absolutely! Any chocolate cookie will do—just be mindful of different crumbs that may need adjusting in the butter ratio.
What if I forget to take the cream cheese out ahead of time?
No worries! You can place the cream cheese in a microwave-safe bowl and warm it up in short 15-second intervals until creamy.
Can I make these gluten-free?
Yes! Simply swap the chocolate cookie crumbs for gluten-free cookies, and you’re good to go!
How can I dress these bars up for a special occasion?
Consider garnishing with fresh cherries, edible flowers, or a drizzle of chocolate sauce for a show-stopping touch!
Final Thoughts
Ah, my dear friends, there you have it: an indulgent, tasty treat that not only fills your tummy but warms your heart. Nothing compares to the joy of sharing homemade desserts with the ones you love. I can’t wait for you to try these Black Forest Cheesecake Bars and feel all the cozy vibes that this delightful recipe brings. Get baking, and remember: you are capable of magic in your kitchen! Happy baking, and may your day be scrumptious! 🖤🍒
Black Forest Cheesecake Bars
Ingredients
Method
- Preheat your oven to 325°F (160°C).
- Line a square baking pan with parchment paper.
- Mix the chocolate cookie crumbs, melted butter, and granulated sugar until combined and crumbly.
- Press the mixture firmly into the prepared pan to form an even layer.
- Bake the crust in the preheated oven for about 10 minutes.
- In a large bowl, beat the softened cream cheese and sugar together until smooth.
- Add the eggs one at a time, mixing well after each addition.
- Stir in the vanilla extract, sour cream, and a pinch of salt until fully combined.
- Pour the cream cheese mixture over the cooled crust and spread it evenly.
- Bake for 25-30 minutes or until the edges are set and the center is slightly jiggly.
- Let the bars cool in the pan for 10 minutes before spreading the cherry pie filling on top.
- Refrigerate for at least 2 hours or overnight.
- Lift the bars out of the pan using the parchment overhang and slice into squares.