
Table of Contents
Every time I step into my cozy kitchen, I have a little tradition of flipping through my grandmother’s handwritten recipe book. One day, I stumbled upon a note tucked between the pages that detailed her mini chocolate pies. Oh, the smell of melting chocolate and sweet cream wafting through the air! It whisked me back to childhood afternoons spent savoring those little divine bites, each exploding with rich chocolate flavor. My heart warmed as I made them for my own family, and I can assure you that the joy these mini pies bring is absolutely infectious. They’ve become a beloved treat in my home, and I just know they’ll find a special place in yours as well!
Why You’ll Love This Recipe
- Quick and Easy: With straightforward steps, you’ll have these delectable treats ready in no time!
- Decadently Delicious: The silky smooth chocolate filling is irresistible, making every bite a moment of happiness.
- Perfectly Portion-Controlled: Mini pies are just the right size to indulge without the guilt!
- Customizable: With endless topping options or filling ideas, you can truly make them your own.
- Great for Sharing: They are the perfect dessert for gatherings, ensuring everyone gets their share of chocolate bliss.
Ingredients
- 1 pre-made pie crust: Time-saver alert! Use store-bought to keep things simple, but feel free to whip up your own if you’re feeling adventurous!
- 1 cup semi-sweet chocolate chips: Rich and melty, these little gems give the filling that perfect chocolatey goodness.
- 1 cup heavy cream: This creates a lusciously silky filling—just right for a pie of this nature!
- 2 tablespoons sugar: A subtle sweetness to balance the chocolate. Adjust to your taste if you prefer a darker flavor!
- 1 teaspoon vanilla extract: This adds a lovely aroma that complements the chocolate beautifully—don’t skip it!
- Pinch of salt: Just a bit elevates the chocolate notes and brings everything together harmoniously.
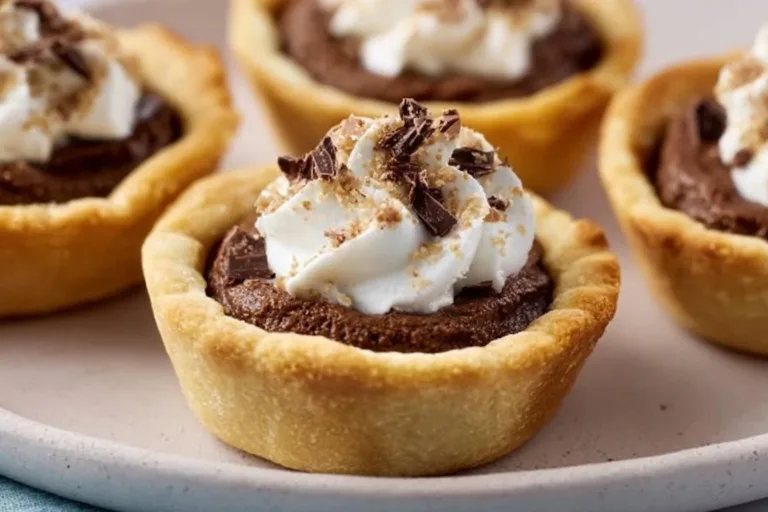
- Whipped cream (for topping): Light and fluffy, it’s the crowning glory on your mini pies.
- Chocolate shavings (for garnish): Elegant and delightful, they’re the finishing touch to make your dessert look fabulous!
Full recipe card is below.
How to Make It
1. Preheat the Oven
Preheat your oven to 350°F (175°C). Get that cozy kitchen vibe going! While the oven graces us with its warmth, cut the pie crust into small circles and gently press them into your mini pie tin molds. Bake for about 10 minutes until they are golden brown. Embrace the smell—it’s going to be delightful! Let them cool off on a wire rack, and get ready for the magic.
2. Prepare the Chocolate Filling
In a saucepan over medium heat, combine the heavy cream, sugar, and a pinch of salt. Stir it lovingly until the sugar is fully dissolved and the mixture is warm—but don’t let it boil! The kitchen will start to smell like heaven.
3. Melt the Chocolate
Remove the pan from heat and add your chocolate chips and vanilla extract. Stir joyfully until the chocolate melts entirely, creating a smooth, shiny mixture that calls for a taste (feel free to sneak a spoonful; no one’s judging!).
4. Fill the Crusts
Pour that luscious chocolate filling into your mini pie crusts, filling them generously. Pop them into the refrigerator for at least 2 hours until they set. The anticipation will be worth it!
5. Serve and Enjoy
Once set, it’s time for the fun part! Top each mini pie with a dollop of whipped cream and sprinkle chocolate shavings for that Insta-worthy touch. Take a moment to appreciate your lovely creation before sharing (or indulging yourself)!
Pro Tips for Success
- Measure ingredients carefully: Precision leads to perfect pies!
- Chill for success: Make sure to give enough time for the chocolate to set in the fridge for the best texture.
- Check your splits: If your chocolate seizes, simply add a splash more cream to the saucepan and gently reheat until smooth again.
- Play with flavors: Don’t shy away from experimenting with different chocolate varieties or extracts!
Flavor Variations
- Seasonal Spice: Add a pinch of cinnamon or nutmeg to the filling for a cozy holiday twist!
- Nutty Crunch: Fold in crushed nuts (like hazelnuts or almonds) for some delightful texture.
- Zesty Delight: Incorporate orange or peppermint extract for a fresh twist on your mini pies.
Serving Suggestions
Serve these mini chocolate pies with fresh berries or a scoop of vanilla ice cream for contrast. Consider a dusting of powdered sugar on your serving plate for an elegant touch, and perhaps pair them with a cup of espresso or a glass of dessert wine. They’re not just treats; they’re a whole experience.
Make-Ahead & Storage
These little beauties can be made one day in advance—perfect for after-dinner treats or holiday gatherings! Store them in an airtight container in the fridge for up to 3 days. They’re great to have on hand for unexpected guests or a midnight snack!
Leftovers
If you have any leftovers (which is rare but can happen), try crumbling them into a parfait with yogurt and fresh fruit. They can also add a fun, chocolaty twist to a scoop of ice cream!
Freezing
Yes, you can freeze them! Wrap each mini pie tightly in plastic wrap, then place them in a freezer-safe container. When you’re ready to enjoy, simply let them thaw in the fridge overnight.
Reheating
These are best served chilled, but if you fancy them warm, gently reheat in a preheated oven at 300°F (150°C) for about 5-7 minutes. Just watch them closely, as you don’t want to spoil the smooth texture!
FAQs
Can I use dark chocolate instead of semi-sweet?
Absolutely! Dark chocolate will give your mini pies a richer, more intense flavor.
What if I don’t have mini pie tins?
No worries! You can use a muffin tin as an alternative—just adjust the baking time accordingly.
How much chocolate filling will I need for larger pies?
For a standard 9-inch pie, double the filling ingredients, and watch your baking time!
Can I add fruits to the filling?
Sure! Just be mindful of the moisture content—drier fruits like dried cranberries work well, whereas fresh fruits should be enjoyed as a garnish.
Final Thoughts
Dear friends, creating these mini chocolate pies is not just about the sumptuous dessert at the end; it’s about the laughter, joy, and little moments shared in the kitchen. So, grab those ingredients and let your kitchen come alive with warmth and love. I cannot wait to hear how they turn out for you! Bake on, and enjoy those sweet moments!
With cupcakes and chocolate hugs,
Chef Emily from vibingRecipes.com