
Table of Contents
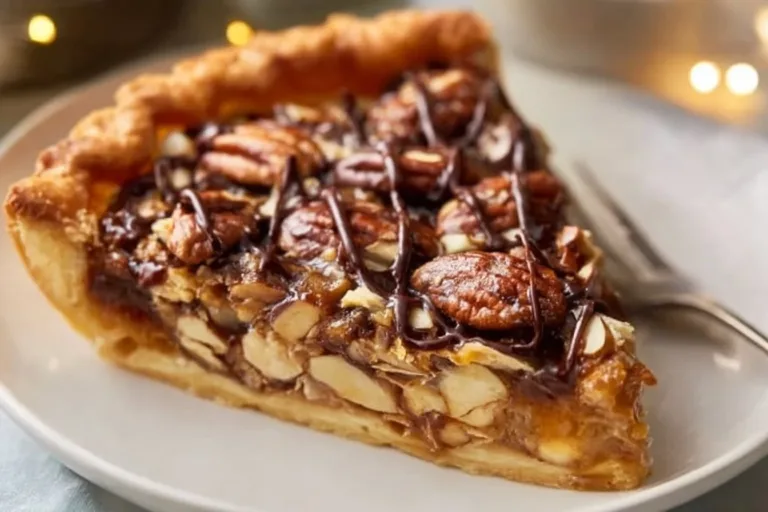
Oh, friends, let me take you on a lovely little journey to my kitchen where the air is suffused with the sweet and nutty aromas of my beloved Chocolate Turtle Pie. I’ll never forget the first time I stumbled upon this luscious treat—it was a chilly fall afternoon, and I was attending a friend’s potluck. The moment I took a bite, a delightful blend of velvety chocolate, rich caramel, and crunchy nuts danced on my taste buds. I knew I had to recreate that heavenly experience at home!
What keeps me coming back to this recipe is how effortlessly it pulls everyone together—the way families gather around the table, laughter mingling with the warm, cozy scents wafting through the kitchen. It’s a slice of joy; the kind that makes your heart flutter and your soul smile. Trust me, once you make this pie, you’ll be diving into a rich, delectable world. And I just know your friends and family will adore you for it!
Why You’ll Love This Recipe
- Super Easy to Make: With simple steps and just a few ingredients, you’ll feel like a baking superstar in no time!
- Decadent Flavors: The combination of chocolate, caramel, and nuts is pure indulgence, making every bite a delightful experience.
- Perfect for Any Occasion: Whether it’s a family gathering or a cozy movie night, this pie is sure to impress.
- No-Bake Chilling: Let the refrigerator do the work! Just chill for a couple of hours, and your delicious pie is ready.
- Versatile: You can easily customize it with your favorite toppings or nuts, making it truly your own.
Ingredients
1 pre-made pie crust
Tip: A graham cracker or chocolate cookie crust adds a fabulous flavor twist and saves you time—win-win!1 cup chocolate chips
Tip: Use semi-sweet for a perfect balance of sweetness, but feel free to experiment with dark chocolate for a richer flavor.1 cup caramel sauce
Tip: Store-bought is perfectly fine if you’re in a hurry, but homemade caramel is heavenly if you’re feeling adventurous.1 cup mixed nuts (e.g., pecans, walnuts)
Tip: Roast the nuts for a few minutes for a richer flavor; just keep an eye on them to prevent burning!1 cup whipped cream
Tip: Freshly whipped cream always tastes better, but store-bought works in a pinch—just stack it high for that perfect pie look!Extra melted chocolate for drizzling
Tip: A drizzle of melted chocolate is like a cherry on top; it adds that professional finish and extra flair!
Full recipe card is below.
How to Make It
1. Preheat the oven to 350°F (175°C).
Let that warm, toasty preheat begin! While you’re waiting, take a moment to enjoy the anticipation.
2. Melt the Chocolate Chips
In a medium saucepan, melt those chocolate chips over low heat, stirring gently until smooth. The irresistible aroma will fill your kitchen, and you might be tempted to sneak a taste or two!
3. Pour the First Layer
Pour half of the melted chocolate into the bottom of the pie crust. Spread it out evenly—like a silky blanket! The warmth will start to embrace the crust.
4. Drizzle with Caramel
Drizzle half of the caramel sauce over that luscious chocolate layer. Let it pool just the way you like it—there’s no wrong way to be generous here!
5. Add the Nuts
Sprinkle mixed nuts on top—give it some crunch! You’ll hear a satisfying little crackle as they land on the caramel.
6. Repeat the Layers
Now, repeat those layers with the remaining chocolate, caramel, and nuts. Each layer builds on the last, creating a tantalizing glimpse of what’s to come.
7. Chill the Pie
Chill the pie in the refrigerator for at least 2 hours. This is when the magic truly happens; your kitchen will smell tempting as it cools!
8. Top and Drizzle
Before serving, top with whipped cream and drizzle with extra melted chocolate. A sprinkle of nuts on top adds a charming touch, perfect for your feasting friends!
Pro Tips for Success
- Don’t Rush the Melting: Keep the heat low when melting chocolate for a smooth consistency—high heat can make it seize up!
- Chilling Time is Key: Allow enough time in the fridge for the flavors to marry. It makes all the difference!
- Festive Decor: Consider adding seasonal sprinkles or a dusting of cocoa powder to delight your guests.
- Taste Before You Pour: Always take a moment to taste your layers; adjust sweetness if needed!
Flavor Variations
- Nut-Free: Skip the nuts for a rich chocolate and caramel pie—perfect for those with allergies.
- Seasonal Twists: Try adding pumpkin pie spices for a fall treat or top with fresh berries in the summer!
- Spice it Up: A sprinkle of sea salt on top of the caramel intensifies the flavors and gives a divine sweet-salt contrast.
Serving Suggestions
Pair your Chocolate Turtle Pie with a scoop of vanilla ice cream for that perfect creamy cold contrast. Presentation tip: serve in clear glass dishes to beautifully display those tempting layers! For drinks, a cozy cup of coffee or a splash of dessert wine complements the rich flavors beautifully.
Make-Ahead & Storage
Make this pie a day in advance for even better flavors! Simply cover it with plastic wrap and keep it in the fridge—no need to worry. It should stay fresh for about 3–4 days, so you have plenty of time to enjoy every slice.
Leftovers
Feeling creative with leftovers? Crumble any remaining pie over your morning yogurt, or mix into whipped cream for a divine dessert dip. You can also layer it in a trifle dish with chocolate pudding for a delightful twist!
Freezing
Yes, this yummy pie can be frozen! Just wrap it tightly in plastic wrap, then aluminum foil to keep it nice and fresh. When you’re ready to indulge, thaw it in the fridge overnight before serving.
Reheating
This pie is lovely served cold, but if you enjoy it warm, simply pop a slice in the microwave for about 15 seconds to soften it up. Be careful not to overheat, as we want to preserve that luscious texture!
FAQs
Can I use different types of chocolate?
Absolutely! Feel free to experiment with milk, dark, or even white chocolate for a different flavor profile.
Can I add fruit to the pie?
Yes! Berries or bananas can make a delicious addition; just layer them in after the nuts for a fresh twist.
Is there a gluten-free version of this pie?
Definitely! Use a gluten-free pie crust, and you’re all set for a delightful treat!
Can I substitute the nuts for sunflower seeds or something else?
Yes! Get creative! Sunflower seeds or even pumpkin seeds add a fun twist while keeping it nut-free.
Final Thoughts
As you gather around the table, sharing stories and laughter while savoring each decadent bite of your Chocolate Turtle Pie, you’ll know that you’ve created something truly special. Let this pie be a symbol of comfort, friendship, and those cozy moments that warm our hearts and homes. Happy baking, my friends—it’s time to dig in and enjoy every rich, delightful bite! Love, Chef Emily.
Chocolate Turtle Pie
Ingredients
Method
- Preheat the oven to 350°F (175°C).
- In a medium saucepan, melt chocolate chips over low heat, stirring gently until smooth.
- Pour half of the melted chocolate into the bottom of the pie crust.
- Drizzle half of the caramel sauce over the chocolate layer.
- Sprinkle mixed nuts on top.
- Repeat the layers with the remaining chocolate, caramel, and nuts.
- Chill the pie in the refrigerator for at least 2 hours.
- Before serving, top with whipped cream and drizzle with extra melted chocolate.